部署夜景增强模型Learning to See in the Dark以及gradio UI编程方法
Published:
前面我们已经把Learning to See in the Dark的paper和原理进行了解读,现在把Learning to See in the Dark(后续简称SID模型)部署看一下效果。
这篇文章选择的部署方式是gradio + 本地pytorch直接推理。先看一下效果:
对单个文件进行夜景增强:(gif加载稍慢,可能要等一下) 
例如下面这张基本全黑的原图,经过超级夜景增强功能后,出图就是正常的观感。
| 原图 | 增强后 |
|---|---|
 |  |
对一个文件夹内的多个文件批量进行增强:(gif加载稍慢,可能要等一下) 
对于多文件的批量处理,用户可以上传文件夹中的图片,然后批量自动处理,在处理过程中,可以看到当前正在处理的信息和进度,也可以看到原图和处理后的对比图。 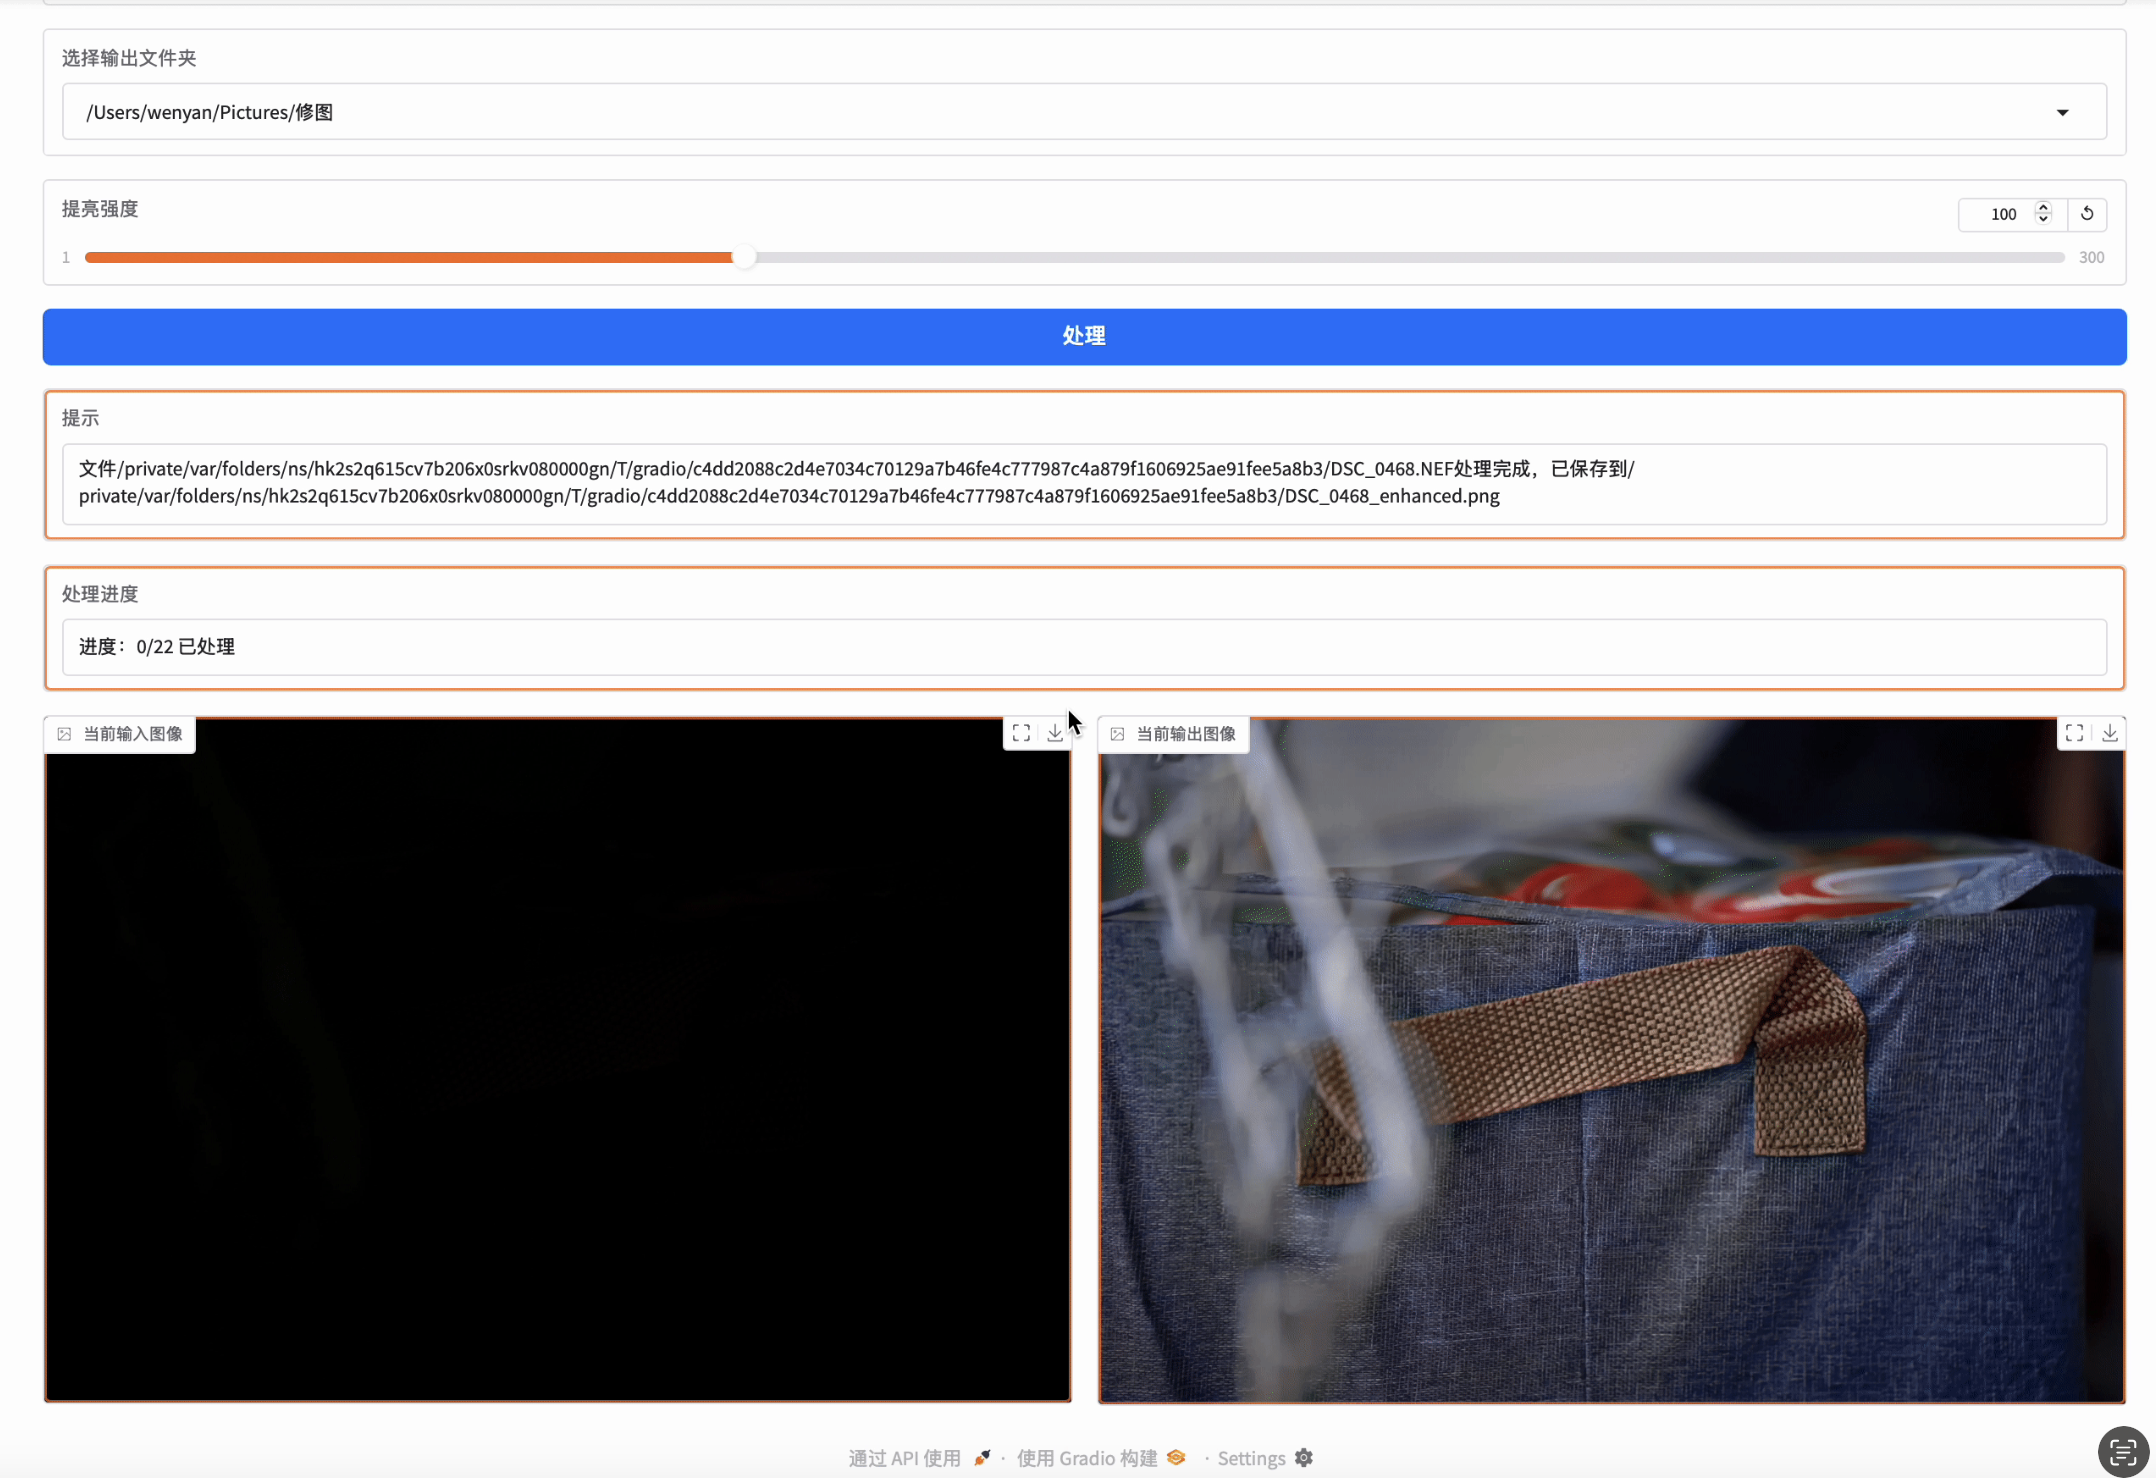
当前的部署提供了优美易用的UI界面,而且夜景增强效果很不错。整个项目可从链接image_toolbox查看。
一、sid的网络结构
SeeInDark 的结构类似 U-Net,适用于低光照图像增强任务。它采用了 编码-解码(Encoder-Decoder)架构,通过 卷积层(Conv)+ 下采样(Pooling)+ 反卷积(UpConv)+ 像素重排(Pixel Shuffle) 来实现高质量的图像增强。
该网络可分为三个部分:
- 编码(Encoder):用于特征提取 通过 多个 3×3 卷积 + Leaky ReLU(LReLU)+ 最大池化(MaxPool) 提取图像的层次化特征。 采用 4 层池化,逐步降低分辨率,同时增加通道数,获取更丰富的语义信息。
- 解码(Decoder):用于恢复高分辨率信息 采用 转置卷积(ConvTranspose2d)+ 跳跃连接(Skip Connection)+ 卷积 逐步恢复高分辨率特征。 通过 跳跃连接(skip connection) 结合低层细节信息,增强重建能力,避免信息丢失。
- 像素重排(Pixel Shuffle):提升分辨率 在输出层 使用 Pixel Shuffle,将通道信息转换为空间信息,实现 超分辨率增强,提升最终图像的清晰度。
class SeeInDark(nn.Module):
    def __init__(self, num_classes=10):
        super(SeeInDark, self).__init__()

        self.conv1_1 = nn.Conv2d(4, 32, kernel_size=3, stride=1, padding=1)
        self.conv1_2 = nn.Conv2d(32, 32, kernel_size=3, stride=1, padding=1)
        self.pool1 = nn.MaxPool2d(kernel_size=2)

        self.conv2_1 = nn.Conv2d(32, 64, kernel_size=3, stride=1, padding=1)
        self.conv2_2 = nn.Conv2d(64, 64, kernel_size=3, stride=1, padding=1)
        self.pool2 = nn.MaxPool2d(kernel_size=2)

        self.conv3_1 = nn.Conv2d(64, 128, kernel_size=3, stride=1, padding=1)
        self.conv3_2 = nn.Conv2d(128, 128, kernel_size=3, stride=1, padding=1)
        self.pool3 = nn.MaxPool2d(kernel_size=2)

        self.conv4_1 = nn.Conv2d(128, 256, kernel_size=3, stride=1, padding=1)
        self.conv4_2 = nn.Conv2d(256, 256, kernel_size=3, stride=1, padding=1)
        self.pool4 = nn.MaxPool2d(kernel_size=2)

        self.conv5_1 = nn.Conv2d(256, 512, kernel_size=3, stride=1, padding=1)
        self.conv5_2 = nn.Conv2d(512, 512, kernel_size=3, stride=1, padding=1)

        self.upv6 = nn.ConvTranspose2d(512, 256, 2, stride=2)
        self.conv6_1 = nn.Conv2d(512, 256, kernel_size=3, stride=1, padding=1)
        self.conv6_2 = nn.Conv2d(256, 256, kernel_size=3, stride=1, padding=1)

        self.upv7 = nn.ConvTranspose2d(256, 128, 2, stride=2)
        self.conv7_1 = nn.Conv2d(256, 128, kernel_size=3, stride=1, padding=1)
        self.conv7_2 = nn.Conv2d(128, 128, kernel_size=3, stride=1, padding=1)

        self.upv8 = nn.ConvTranspose2d(128, 64, 2, stride=2)
        self.conv8_1 = nn.Conv2d(128, 64, kernel_size=3, stride=1, padding=1)
        self.conv8_2 = nn.Conv2d(64, 64, kernel_size=3, stride=1, padding=1)

        self.upv9 = nn.ConvTranspose2d(64, 32, 2, stride=2)
        self.conv9_1 = nn.Conv2d(64, 32, kernel_size=3, stride=1, padding=1)
        self.conv9_2 = nn.Conv2d(32, 32, kernel_size=3, stride=1, padding=1)

        self.conv10_1 = nn.Conv2d(32, 12, kernel_size=1, stride=1)

    def forward(self, x):
        conv1 = self.lrelu(self.conv1_1(x))
        conv1 = self.lrelu(self.conv1_2(conv1))
        pool1 = self.pool1(conv1)

        conv2 = self.lrelu(self.conv2_1(pool1))
        conv2 = self.lrelu(self.conv2_2(conv2))
        pool2 = self.pool1(conv2)

        conv3 = self.lrelu(self.conv3_1(pool2))
        conv3 = self.lrelu(self.conv3_2(conv3))
        pool3 = self.pool1(conv3)

        conv4 = self.lrelu(self.conv4_1(pool3))
        conv4 = self.lrelu(self.conv4_2(conv4))
        pool4 = self.pool1(conv4)

        conv5 = self.lrelu(self.conv5_1(pool4))
        conv5 = self.lrelu(self.conv5_2(conv5))

        up6 = self.upv6(conv5)
        up6 = torch.cat([up6, conv4], 1)
        conv6 = self.lrelu(self.conv6_1(up6))
        conv6 = self.lrelu(self.conv6_2(conv6))

        up7 = self.upv7(conv6)
        up7 = torch.cat([up7, conv3], 1)
        conv7 = self.lrelu(self.conv7_1(up7))
        conv7 = self.lrelu(self.conv7_2(conv7))

        up8 = self.upv8(conv7)
        up8 = torch.cat([up8, conv2], 1)
        conv8 = self.lrelu(self.conv8_1(up8))
        conv8 = self.lrelu(self.conv8_2(conv8))

        up9 = self.upv9(conv8)
        up9 = torch.cat([up9, conv1], 1)
        conv9 = self.lrelu(self.conv9_1(up9))
        conv9 = self.lrelu(self.conv9_2(conv9))

        conv10= self.conv10_1(conv9)
        out = nn.functional.pixel_shuffle(conv10, 2)
        return out

    def _initialize_weights(self):
        for m in self.modules():
            if isinstance(m, nn.Conv2d):
                m.weight.data.normal_(0.0, 0.02)
                if m.bias is not None:
                    m.bias.data.normal_(0.0, 0.02)
            if isinstance(m, nn.ConvTranspose2d):
                m.weight.data.normal_(0.0, 0.02)

    def lrelu(self, x):
        outt = torch.max(0.2*x, x)
        return outt
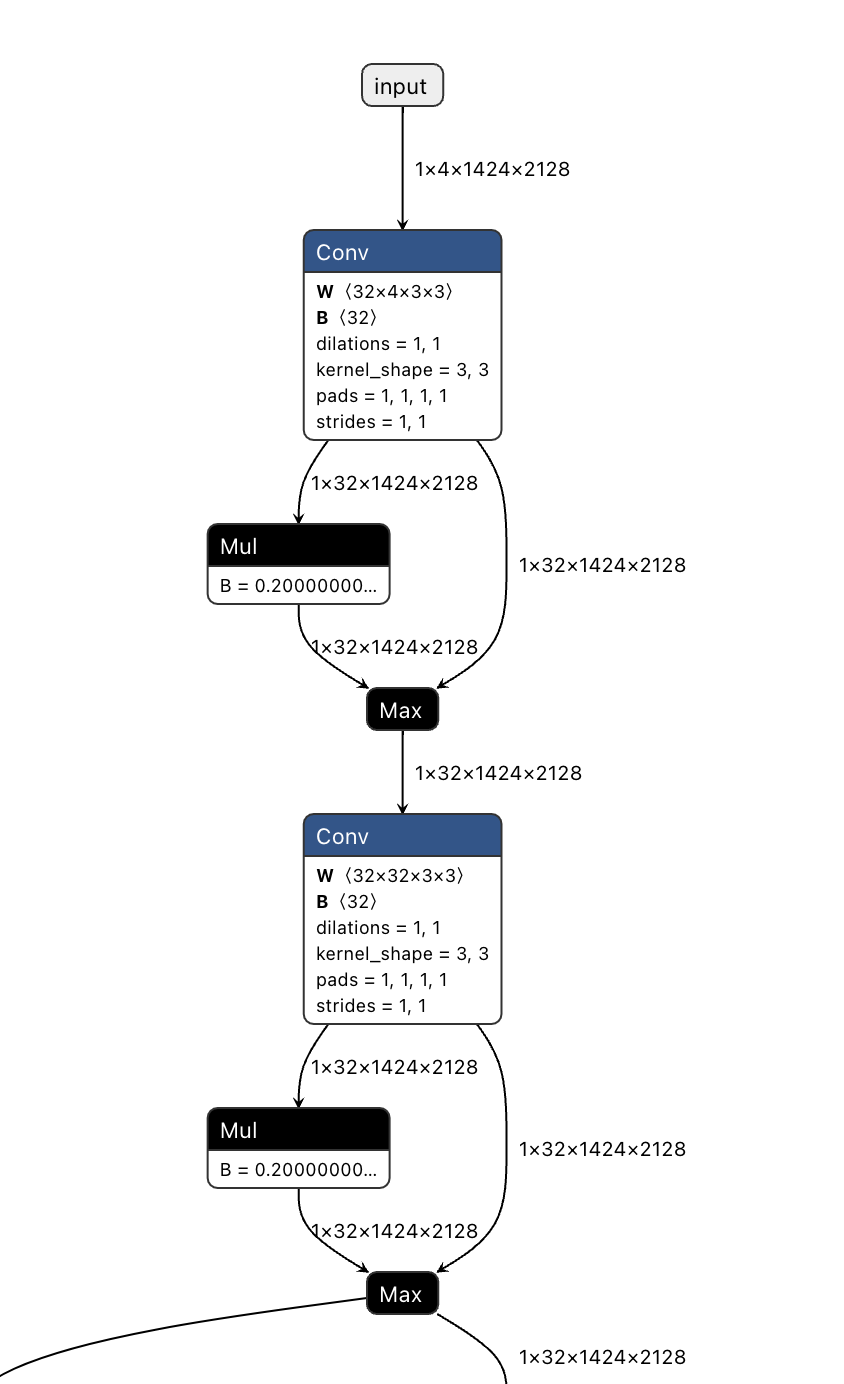
sid的网络结构相对比较简单,是一个UNet结构的网络。
网络是一个4通道的输入,在网络的开头,通过使用kernel size=3, pad=1, stride=1的conv,来保持了特征图尺寸不变。4通道的输入来自于将raw图的rggb进行了拆分,拆分到了4通道。
def pack_raw(raw,white_level,black_level):
    #pack Bayer image to 4 channels
    im = np.maximum(raw - black_level,0)/ (white_level - black_level) #subtract the black level

    im = np.expand_dims(im,axis=2)
    img_shape = im.shape
    H = img_shape[0]
    W = img_shape[1]

    out = np.concatenate((im[0:H:2,0:W:2,:],
                       im[0:H:2,1:W:2,:],
                       im[1:H:2,1:W:2,:],
                       im[1:H:2,0:W:2,:]), axis=2)
    #print(f'pack_raw,{out.shape = }')
    return out
在编码部分,通过多个maxpool+conv+conv的block,实现了特征图的降采样。 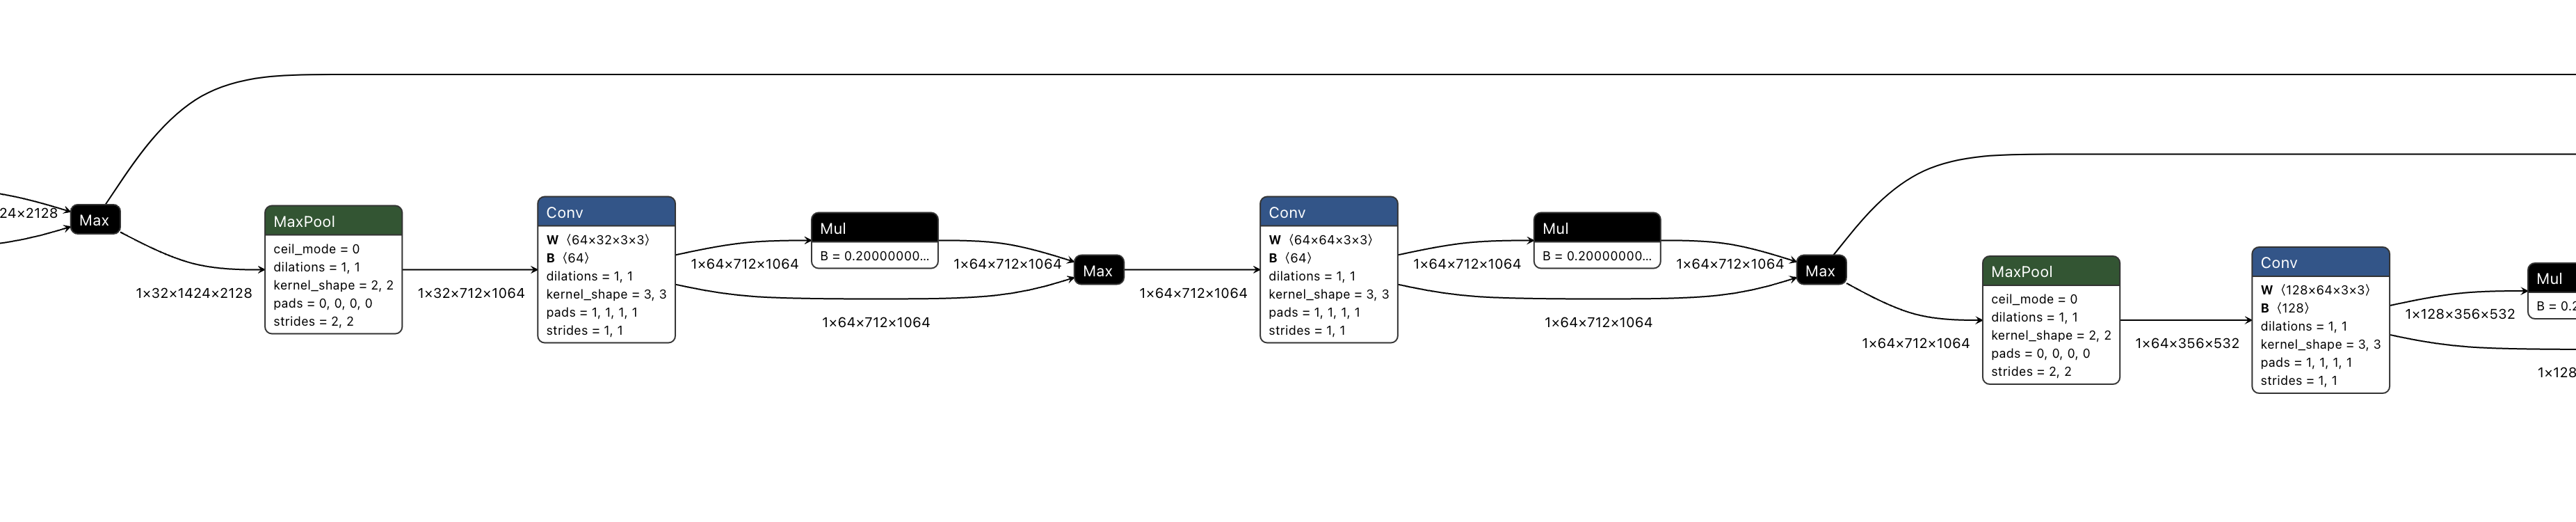
在解码部分,通过多个conv+conv+ConvTranspose的block,实现了特征图的上采样。 
最后,还是通过使用kernel size=3, pad=1, stride=1的conv以及kernel=1,pad=0,stride=1的conv,来保持特征图尺寸一致。最后通过一个nn.pixel_shuffle(Depth2Space)得到最终的RGB出图。 
sid网络结构的几个问题
1. 对于图像恢复的,为什么可以用MaxPool?
在 SeeInDark 这个网络中,MaxPool2d(最大池化) 的使用是合理的,主要原因如下:
1. 最大池化的作用
最大池化(MaxPool2d) 主要用于:
- 降低特征图的分辨率(减小计算量)。
- 增加感受野,捕捉更大范围的特征。
- 增强特征的稳健性(减少对微小噪声的敏感性)。
2. 为什么可以用 MaxPool?
(1) 最大池化不会丢失关键信息
在 低光增强任务 中,网络的目标是从 低光噪声图像 中提取关键特征,而不是单纯地保留所有像素细节。
最大池化有助于去除 细微噪声,保留主要 亮度信息 和 轮廓信息。
- 例如:
- 卷积层(Conv)提取特征 → 最大池化(MaxPool)去除不必要的细节。
- 这样可以使网络关注 大尺度的光照模式,而非噪声干扰。
(2) 最大池化能提高网络的感受野
感受野(Receptive Field) 指的是 网络每个神经元能够看到的输入区域。
在低光增强任务中:
- 局部像素值通常 变化较大(由于噪声)。
- 但 大区域的亮度模式(如光源位置、物体边界)较稳定。
最大池化可以:
- 扩大感受野,让网络关注更大区域的图像信息。
- 减少计算复杂度,降低显存需求,提高训练效率。
(3) U-Net 结构+跳跃连接弥补池化的缺点
一个问题是,最大池化可能导致细节信息的损失。然而,该网络采用了 U-Net 结构,具有 跳跃连接(Skip Connection):
- 在解码部分,低层特征直接连接到高层,保留了 局部细节。
- 这样,最大池化的 全局特征提取 能力可以与跳跃连接的 局部信息恢复 结合,既减少噪声,又不丢失关键信息。
(4) 对比平均池化(AvgPool)
另一种池化方法是 平均池化(AvgPool),计算局部区域的均值,而非最大值。
| MaxPool | AvgPool | |
|---|---|---|
| 计算方式 | 取最大值 | 计算均值 |
| 适用于 | 纹理、边缘检测 | 平滑、模糊 |
| 效果 | 选择最显著特征 | 可能丢失对比度 |
在 低光增强任务 中,图像通常很暗,关键细节(如亮部区域)相对稀少。MaxPool 更适合提取关键亮部特征,而不会导致模糊化。
3. 结论
在 SeeInDark 这种低光增强网络中,使用 MaxPool2d 是合理的,主要原因是:
- 去除噪声,提高稳健性(避免对细微噪声过度敏感)。
- 扩大感受野(让网络关注大范围的亮度信息)。
- 减少计算量,提高训练效率。
- 跳跃连接弥补了最大池化的信息损失,能在解码阶段恢复细节。
因此,最大池化在这个任务中能有效帮助提取关键的亮度和边缘信息,是合理的设计选择。
2. 最后采用nn.PixelShuffle来实现分辨率增强,相比使用ConvTranspose或者其他方式,有什么优点?
在 SeeInDark 网络的最后一层使用了 nn.PixelShuffle 进行 分辨率增强(Super-Resolution),这是一个 合理且高效 的设计选择。相比于 转置卷积(ConvTranspose2d) 或 插值(Interpolation),PixelShuffle 具有以下几个显著的优点:
1. 什么是 PixelShuffle?
nn.PixelShuffle(upscale_factor=2) 作用是:
- 输入通道数 = (目标通道数 × upscale_factor²)
- 通道信息转换为空间信息,从而 提高分辨率。
举例:
- 输入:12 通道(C=12)× H × W
- 输出:3 通道(C=3)× 2H × 2W(RGB 三通道图像)
计算方式:
- 12 通道的输入被重新排列为
3 × (2×2) = 12个像素块。 - 这个重排操作直接映射到更高分辨率的图像,而不需要额外计算。
2. 为什么 PixelShuffle 更适合这个任务?
(1) 避免了 Checkerboard Artifacts(棋盘格伪影)
相比 转置卷积(ConvTranspose2d),PixelShuffle 不会产生棋盘格伪影(checkerboard artifacts)。
棋盘格伪影的来源
- 转置卷积(ConvTranspose2d) 由于 跨步(stride)和填充(padding),可能会导致像素值在上采样时分布不均匀,形成棋盘格伪影。
- PixelShuffle 仅重新排列像素,不引入额外计算,避免了这一问题。
💡 结论:PixelShuffle 天然平滑,没有伪影,适用于 低光增强 这种对图像质量要求高的任务。
(2) 更高效的计算
PixelShuffle 主要是张量重排(rearrange operation),相比 转置卷积(ConvTranspose2d) 和 双线性插值(Bilinear Interpolation),计算量更小:
- ConvTranspose2d 需要 额外的卷积计算。
- 插值(Bilinear 或 Bicubic) 需要 插值计算。
- PixelShuffle 只是 reshape + permute,计算复杂度低,速度快。
💡 结论:PixelShuffle 速度更快,计算量更低,更节省显存。
(3) 更好地保留细节
低光增强任务需要 增强高频信息(如纹理、边缘),PixelShuffle 比双线性插值更能保留细节:
- Bilinear/Bicubic Interpolation:对整个图像进行插值,会导致高频细节丢失,图像变模糊。
- PixelShuffle:直接从网络的特征通道中 提取和重排高分辨率信息,不会引入模糊。
💡 结论:PixelShuffle 在保持高频细节方面比插值方法更优。
(4) 适用于超分辨率任务
PixelShuffle 最早用于 超分辨率重建(Super-Resolution, SR),例如:
- EDSR(Enhanced Deep SR)
- SRResNet
- ESRGAN(SR-GAN)
SeeInDark 需要 提升图像亮度,同时增强细节,使用 PixelShuffle 可以 在放大分辨率的同时恢复图像质量。
💡 结论:PixelShuffle 更适合图像增强和超分辨率任务,比普通的 ConvTranspose2d 更能保留 精细纹理。
3. PixelShuffle vs ConvTranspose2d vs Interpolation 对比
| 方法 | 计算量 | 细节保持 | 伪影风险 | 适用场景 | |:—–|:———-:|:————:|:————:|:————| | PixelShuffle | ✅ 低 | ✅ 高(清晰) | ✅ 无棋盘格 | 超分辨率、去噪、低光增强 | | ConvTranspose2d | ❌ 高 | 🔶 可能丢失 | ❌ 高(棋盘格) | 生成对抗网络(GAN)、分割任务 | | Bilinear Interpolation | ✅ 低 | ❌ 细节丢失 | ✅ 无 | 一般性放大(如 CNN 最后层) |
4. 结论
SeeInDark 采用 PixelShuffle 进行分辨率增强是一个 优雅的设计,相比 ConvTranspose2d 或插值方法,它的主要优势是:
- 避免棋盘格伪影(比
ConvTranspose2d更稳定)。 - 计算量更低,更快(仅需 reshape 操作)。
- 更好地保留细节(比双线性插值更清晰)。
- 超分辨率任务的标准做法(更适合低光增强任务)。
综上,PixelShuffle 在 SeeInDark 网络中的使用是一个聪明的选择,在保持高质量输出的同时,确保了计算效率和稳定性。 🚀
二、使用gradio创建UI的方法
我们以展示的UI代码为例展开说明:
class GradioUI:
    def __init__(self, image_processor):
        self.image_processor = image_processor
        self.demo = self.create_ui()

    def create_ui(self):
        with gr.Blocks() as demo:
            gr.Markdown("# The Image Toolbox Is All You Need")
            demo.css = """
            #batch-process-button {
                background-color: #007AFF;
                color: white;
            }
            """
            with gr.Tabs() as tabs:
                self.create_night_enhance_tab()
                self.create_exif_parser_tab()
                self.create_image_resize_tab()
        return demo

    def create_night_enhance_tab(self):
        with gr.TabItem("极暗夜景增强", id="night_enhance"):
            mode = gr.Radio(["单个文件处理", "批量处理"], label="模式选择", value="单个文件处理")
            single_file_row, batch_file_row = self.create_single_file_ui(), self.create_batch_file_ui()
            mode.change(self.update_ui_mode, inputs=[mode], outputs=[single_file_row, batch_file_row])

    def create_single_file_ui(self):
        with gr.Row(visible=True) as single_file_row:
            with gr.Column():
                with gr.Row():
                    input_image = gr.File(label="输入RAW图像文件")
                    output_image = gr.Image(label="输出图像")
                with gr.Row():
                    ratio_single_bar = gr.Slider(label="提亮强度", minimum=0, maximum=300, value=100, step=10)
                with gr.Row():
                    process_button_single = gr.Button("处理", elem_id="batch-process-button")
                with gr.Row():
                    error_message_box = gr.Textbox(label="错误提示", value="", visible=False, interactive=False)
                with gr.Row():
                    gr.Markdown("""
                    <span style='font-size: 18px;'></span>  \n
                    <span style='font-size: 18px;'>请传入RAW图</span>  \n
                    <span style='font-size: 18px;'>当前算法只能处理肉眼看起来极暗的照片,如果处理正常曝光的图片,处理后就会过曝。</span>
                    """)
                examples_data = [
                    ["assets/input_0475.png", 300, "assets/out_0475.png"],
                    ["assets/input_0139.png", 1, "assets/out_0139.png"]
                ]
                with gr.Row():
                    gr.Examples(examples=examples_data, inputs=[input_image, ratio_single_bar, output_image], label="示例表格")
                process_button_single.click(
                    self.validate_and_process_single,
                    inputs=[input_image, ratio_single_bar],
                    outputs=[output_image, error_message_box, error_message_box]
                )
        return single_file_row

    def create_batch_file_ui(self):
        with gr.Row(visible=False) as batch_file_row:
            with gr.Column():
                with gr.Row(scale=1):
                    input_folder = gr.File(label="选择输入文件夹,选择到最底层文件夹即可,不要选择单个文件", file_count="directory")
                with gr.Row(scale=1):
                    output_folder = gr.Dropdown(choices=self.list_non_hidden_files(os.path.expanduser("~/Pictures")), label="选择输出文件夹")
                with gr.Row():
                    ratio_batch_bar = gr.Slider(label="提亮强度", minimum=1, maximum=300, value=100, step=1)
                with gr.Row():
                    batch_process_button = gr.Button("处理", elem_id="batch-process-button")
                with gr.Row():
                    error_message_box = gr.Textbox(label="提示", value="", visible=True, interactive=False)
                progress_display = gr.Textbox(label="处理进度", interactive=False)
                with gr.Row():
                    input_image_display = gr.Image(label="当前输入图像", interactive=False)
                    output_image_display = gr.Image(label="当前输出图像", interactive=False)
                batch_process_button.click(
                    self.image_processor.enhance_night_image_batch,
                    inputs=[input_folder, output_folder, ratio_batch_bar],
                    outputs=[error_message_box, input_image_display, output_image_display, progress_display],
                    queue=True
                )
        return batch_file_row

    def create_exif_parser_tab(self):
        with gr.TabItem("EXIF解析", id="exif_parser"):
            gr.Markdown("EXIF解析功能开发中...")

    def create_image_resize_tab(self):
        with gr.TabItem("图像resize", id="image_resize"):
            gr.Markdown("图像resize功能开发中...")

    @staticmethod
    def list_non_hidden_files(path):
        """列出指定路径下的非隐藏文件和文件夹"""
        if not os.path.exists(path):
            return []
        return [os.path.join(path, f) for f in os.listdir(path) if not f.startswith('.')]

    @staticmethod
    def update_ui_mode(selected_mode):
        if selected_mode == "单个文件处理":
            return gr.update(visible=True), gr.update(visible=False)
        else:
            return gr.update(visible=False), gr.update(visible=True)

    def validate_and_process_single(self, file, ratio):
        """验证文件格式并处理单张图像"""
        allowed_extensions = {".raw", ".dng", ".arw", ".nef"}
        if file is None:
            return None, "请上传一个文件。", gr.update(visible=True)
        _, ext = os.path.splitext(file.name)
        if ext.lower() not in allowed_extensions:
            return None, f"文件格式错误:{ext}。请上传RAW格式文件(例如:.raw, .dng)。", gr.update(visible=True)
        result = self.image_processor.enhance_night_image_single(file, ratio)
        return result, "", gr.update(visible=False)

    # def validate_and_process_batch(self, input_folder, output_folder, ratio):
    #     """验证文件格式并处理批量图像"""
    #     #return self.image_processor.enhance_night_image_batch(input_folder, output_folder, ratio)
    #     error_message, input_image, output_image, progress_dis = self.image_processor.enhance_night_image_batch(input_folder, output_folder, ratio)
    #     return  error_message, input_image, output_image, progress_dis

    def launch(self):
        self.demo.launch(share=False)

# 主函数
def main():
    device = DeviceChecker.get_device()
    image_processor = NightEnhancer(device)
    gradio_ui = GradioUI(image_processor)
    gradio_ui.launch()

if __name__ == "__main__":
    main()
Gradio UI 编程方法总结
Gradio 是一个用于快速构建 Web 界面的 Python 库,适用于机器学习模型的可视化与交互。本代码展示了 Gradio UI 的完整开发流程,涵盖 组件、交互逻辑、回调函数 及 多页面管理。以下是 Gradio UI 编程的主要方法总结:
1. Gradio UI 的基本结构
Gradio 的 UI 由 Blocks、Tabs、Components 组成,并通过 事件绑定 连接逻辑。
(1) Blocks 作为 UI 容器
在 GradioUI 类中,所有 UI 组件都是在 gr.Blocks() 作用域内创建的:
with gr.Blocks() as demo:
Blocks是 Gradio 的高级 UI 容器,支持 多列、多行、组件交互。Tabs用于创建多页面界面,如 “夜景增强”、”EXIF解析” 等。
2. 使用 Tabs 组织多页面 UI
在 create_ui() 方法中,使用 gr.Tabs() 创建多个选项卡:
with gr.Tabs() as tabs:
    self.create_night_enhance_tab()
    self.create_exif_parser_tab()
    self.create_image_resize_tab()
每个选项卡对应一个功能模块,使得 UI 层次清晰,适合复杂的应用。
3. UI 组件的使用
Gradio 提供多种 输入输出组件,在 create_single_file_ui() 和 create_batch_file_ui() 方法中使用了多个 UI 组件:
(1) 输入组件
input_image = gr.File(label="输入RAW图像文件")
ratio_single_bar = gr.Slider(label="提亮强度", minimum=0, maximum=300, value=100, step=10)
mode = gr.Radio(["单个文件处理", "批量处理"], label="模式选择", value="单个文件处理")
gr.File()允许用户上传文件。gr.Slider()创建滑块调整参数。gr.Radio()创建单选按钮。
(2) 输出组件
output_image = gr.Image(label="输出图像")
error_message_box = gr.Textbox(label="错误提示", value="", visible=False, interactive=False)
gr.Image()显示处理后的图片。gr.Textbox()用于显示错误信息。
(3) 交互组件
process_button_single = gr.Button("处理", elem_id="batch-process-button")
gr.Button()触发图像处理逻辑。
4. 组件交互(事件绑定)
事件绑定是 Gradio UI 的核心,允许不同组件协同工作。本代码中,mode.change() 绑定了单选模式的 状态更新:
mode.change(self.update_ui_mode, inputs=[mode], outputs=[single_file_row, batch_file_row])
- 当
mode变化时,调用update_ui_mode(),根据模式切换 单文件 / 批量 UI 的可见性。
事件绑定的通用格式:
组件.事件(回调函数, inputs=[输入组件], outputs=[输出组件])
5. 处理逻辑与验证
在 validate_and_process_single() 中,进行 文件格式检查,并调用 image_processor 进行图像处理:
process_button_single.click(
    self.validate_and_process_single,
    inputs=[input_image, ratio_single_bar],
    outputs=[output_image, error_message_box, error_message_box]
)

在这个process_button_single的按钮的点击事件上,绑定的是self.validate_and_process_single函数,`inputs=[input_image, ratio_single_bar]`表示self.validate_and_process_single函数接收两个input,一个是input_image,一个是ratio_single_bar。`outputs=[output_image, error_message_box, error_message_box]`表示self.validate_and_process_single的返回值与gradio的`output_image, error_message_box, error_message_box`这三个组件绑定,函数的返回值同步到组件的update上面。

def validate_and_process_single(self, file, ratio):
    allowed_extensions = {".raw", ".dng", ".arw", ".nef"}
    if file is None:
        return None, "请上传一个文件。", gr.update(visible=True)
    _, ext = os.path.splitext(file.name)
    if ext.lower() not in allowed_extensions:
        return None, f"文件格式错误:{ext}。请上传RAW格式文件。", gr.update(visible=True)
    result = self.image_processor.enhance_night_image_single(file, ratio)
    return result, "", gr.update(visible=False)
- 检查
file是否为空。 - 确保文件格式为 RAW(
.dng,.arw,.nef)。 - 处理完成后返回 输出图像 和 错误信息。
6. 使用yield让组件交互(事件绑定)实时更新
在第5条,组件的更新通过validate_and_process_single函数的return来把output的结果同步到gradio的UI组件上,但是这样有个缺点,只有当函数全部运行完成,return结果后,gradio的UI组件才能更新。对于单个文件处理,这样是可以的。但是如果是批量文件处理,我们想在多个文件处理过程中看到正在处理第几个文件的log信息,使用return就不合适了,return后函数就运行完成了。所以使用yield可以完成这个需求。
batch_process_button.click(
    self.image_processor.enhance_night_image_batch,
    inputs=[input_folder, output_folder, ratio_batch_bar],
    outputs=[error_message_box, input_image_display, output_image_display, progress_display],
    queue=True
)

#在这里,我们把gradio的UI上的批量处理的按钮的点击事件,绑定到`self.image_processor.enhance_night_image_batch`函数上。函数的实现为:

def enhance_night_image_batch(self, input_folder, output_folder, ratio):
    """批量增强夜景图像"""
    allowed_extensions = {".raw", ".dng", ".arw", ".nef"}
    total_files = len(input_folder)
    for idx, cur_file in enumerate(input_folder):
        cur_file_path = cur_file
        if cur_file_path is None:
            yield "当前文件不存在", None, None, f"进度:{idx}/{total_files} 已处理"
            continue

        cur_file_name, ext = os.path.splitext(cur_file_path.name)
        if ext.lower() not in allowed_extensions:
            yield f"文件:{cur_file_path.name}不是raw文件,略过处理。请使用raw文件(例如:.raw, .dng)。", None, None, f"进度:{idx}/{total_files} 已处理"
            continue

        try:
            raw = rawpy.imread(cur_file_path)
            im = raw.postprocess(use_camera_wb=True, half_size=False, no_auto_bright=True, output_bps=16)
            scale_full = np.expand_dims(np.float32(im / 65535.0), axis=0) * 1
            scale_full = scale_full[0, :, :, :]
            processed_image = (scale_full * 255).astype('uint8')
            result = self.enhance_night_image_single(cur_file_path, ratio)
            output_folder_path = os.path.join(output_folder, cur_file_name + "_enhanced.png")
            if result.dtype != np.uint8:
                result = (result * 255).astype(np.uint8)
            Image.fromarray(result, 'RGB').save(output_folder_path)
            yield f"文件{cur_file_path.name}处理完成,已保存到{output_folder_path}", processed_image, result, f"进度:{idx}/{total_files} 已处理"
        except Exception as e:
            yield f"处理文件 {cur_file_path.name} 时发生错误,略过处理,错误信息:{e}", None, None, f"进度:{idx}/{total_files} 已处理"
            continue

    yield "处理完成", None, None, f"进度:{total_files}/{total_files} 已处理"
在enhance_night_image_batch函数中,我们通过yield来返回各组件的值。例如yield f"文件{cur_file_path.name}处理完成,已保存到{output_folder_path}", processed_image, result, f"进度:{idx}/{total_files} 已处理"这句,根据
batch_process_button.click(
    self.image_processor.enhance_night_image_batch,
    inputs=[input_folder, output_folder, ratio_batch_bar],
    outputs=[error_message_box, input_image_display, output_image_display, progress_display],
    queue=True
)
的事件绑定可知,yield的第一个返回值f"文件{cur_file_path.name}处理完成,已保存到{output_folder_path}"对应的是error_message_box的信息更新, processed_image对应的是input_image_display的UI信息更新,其他同理。通过yield,就不用等函数全部运行完成后更新UI的组件了,函数运行过程中就可以实现UI的更新。
7. 批量任务 & 进度更新
对于批量任务,create_batch_file_ui() 中实现:
batch_process_button.click(
    self.image_processor.enhance_night_image_batch,
    inputs=[input_folder, output_folder, ratio_batch_bar],
    outputs=[error_message_box, input_image_display, output_image_display, progress_display],
    queue=True  # 允许任务排队执行
)
queue=True使任务支持排队,适用于 长时间运行的任务。- 处理过程中,
progress_display显示当前进度。
8. 启动 Gradio UI
launch() 方法用于启动 Web 界面:
def launch(self):
    self.demo.launch(share=False)
share=False仅在本地运行,设置为True可获取公网链接。
总结
Gradio UI 编程的 核心思想:
- 使用
Blocks组织 UI 结构(支持多页面)。 - 使用
Tabs划分功能模块(如”夜景增强”、”EXIF解析”)。 - 使用
Radio+Row控制 UI 显示状态(单个文件 vs 批量模式)。 - 组件交互(事件绑定)(按钮触发处理,单选框切换模式)。
- 使用
queue=True支持批量任务排队(适用于长时间任务)。 - 使用
launch()启动 Web 界面。
本代码展示了 完整的 Gradio UI 结构,适用于 图像处理、机器学习模型部署 等应用。🚀