DIY相机(三)picamera2库手册解读
Published:
- 使用QtGL作为preview的backend时,图像的输出大小是有限制的。
from picamera2 import Picamera2, Preview
picam2 = Picamera2()
picam2.start_preview(Preview.QTGL)
There is a limit to the size of image that the 3D graphics hardware on the Pi can handle. For Raspberry Pi 4 this limit
is  4096  pixels  in  either  dimension.  For  Pi  3  and  earlier  devices  this  limit  is  2048  pixels.  If  you  try  to  feed  a  larger
image to the QtGL preview window it will report an error and the program will terminate.
- 使用DRM/KMS作为preview的backend时,对display driver是有要求的。需要在/boot/config.txt中配置dtoverlay=vc4-kms-v3d
from picamera2 import Picamera2, Preview
picam2 = Picamera2()
picam2.start_preview(Preview.DRM)
The  DRM/KMS  preview  window  is  not  supported  when  using  the  legacy  fkms  display  driver.  Please  use  the
recommended kms display driver (dtoverlay=vc4-kms-v3d in your /boot/config.txt file) instead
- preview的backend,应避免使用QT。使用QtGL,是有3d硬件加速的,但是使用QT,是纯软件的渲染。
from picamera2 import Picamera2, Preview
picam2 = Picamera2()
picam2.start_preview(Preview.QT)
Like the QtGL preview, this window is also implemented using the Qt framework, but this time using software rendering
rather than 3D hardware acceleration. As such, it is computationally costly and should be avoided where possible. Even
a Raspberry Pi 4 will start to struggle once the preview window size increases
- preview的NULL backend,可以将图像提供给其他的应用程序使用。
from picamera2 import Picamera2, Preview
picam2 = Picamera2()
picam2.start_preview(Preview.NULL)
Normally it is the preview window that actually drives the libcamera system by receiving camera images, passing them
to  the  application,  and  then  recycling  those  buffers  back  to  libcamera  once  the  user  no  longer  needs  them.  The
consequence  is  then  that  even  when  no  preview  images  are  being  displayed,  something  still  has  to  run  in  order  to
receive and then return those camera images.
This is exactly what the NULL preview does. It displays nothing; it merely drives the camera system
- camera使用前必须配置configuration,目前只有三种创建configuration的API
picamera2.create_preview_configuration() # will generate a configuration suitable for displaying camera preview images on the display, or prior to capturing a still image
picamera2.create_still_configuration() # will generate a configuration suitable for capturing a high-resolution still image
picamera2.create_video_configuration() # will generate a configuration suitable for recording video file
- 树莓派CSI摄像头的数据处理过程
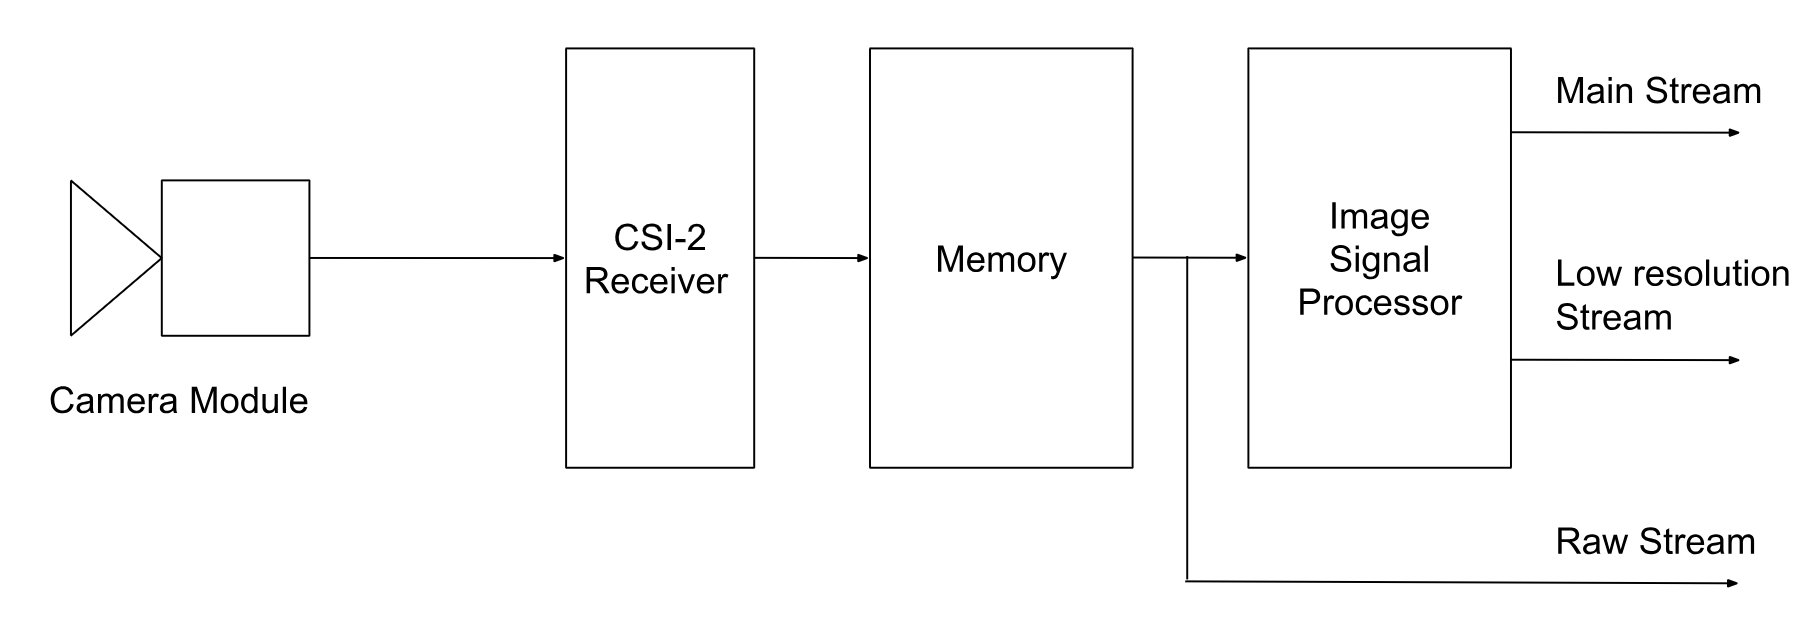
下面的这几个参数,会影响所有的输出流:
• transform - whether camera images are horizontally or vertically mirrored, or both (giving a 180 degree rotation). All three streams (if present) share the same transform. • colour_space - the colour space of the output images. The main and lores streams must always share the same colour space. The raw stream is always in a camera-specific colour space. • buffer_count - the number of sets of buffers to allocate for the camera system. A single set of buffers represents one buffer for each of the streams that have been requested.
• queue - whether the system is allowed to queue up a frame ready for a capture request. • display - this names which (if any) of the streams are to be shown in the preview window. It does not actually affect the camera images in any way, only what Picamera2 does with them. • encode - this names which (if any) of the streams are to be encoded if a video recording is started. This too does not affect the camera images in any way, only what Picamera2 does with them.
- colour space的配置可通过colour_space关键字传入
from picamera2 import Picamera2
from libcamera import ColorSpace
picam2 = Picamera2()
preview_config = picam2.create_preview_configuration(colour_space=ColorSpace.Sycc())
如果省略这个配置的话,默认情况是:
• create_preview_configuration and create_still_configuration will use the sYCC colour space by default (by which we mean sRGB primaries and transfer function and full-range BT.601 YCbCr encoding). • create_video_configuration will choose sYCC if the main stream is requesting an RGB format. For YUV formats it will choose SMPTE 170M if the resolution is less than 1280x720, otherwise Rec.709.
- buffer_count的相关问题
buffer_count越多,camera运行的会越丝滑,而且丢帧会更少,但是意味着要用更多的ram。默认情况下,各场景需要的buffer_count为:
• create_preview_configuration requests four sets of buffers
• create_still_configuration requests just one set of buffers (as these are normally large full resolution buffers)
• create_video_configuration requests six buffers, as the extra work involved in encoding and outputting the video
streams makes it more susceptible to jitter or delays, which is alleviated by the longer queue of buffers
也可以自己通过buffer_count关键字传入
from picamera2 import Picamera2
picam2 = Picamera2()
preview_config = picam2.create_still_configuration(buffer_count=2)
- queue相关问题
默认情况下,picamera2会保留一个queue,放着捕捉的camera frames,当需要拍照时,直接把最后一帧的数据返回。但是这样的问题是,返回的frame在时间线上会略早于当前的实际场景。如果我们需要严格的当前点的图像数据,我们可以禁用queue。
原文是这么说的:
By  default,  Picamera2  keeps  hold  of  the  last  frame  to  be  received  from  the  camera  and,  when  you  make  a  capture
request,  this  frame  may  be  returned  to  you.  This  can  be  useful  for  burst  captures,  particularly  when  an  application  is
doing  some  processing  that  can  take  slightly  longer  than  a  frame  period.  In  these  cases,  the  queued  frame  can  be
returned immediately rather than remaining idle until the next camera frame arrives.
But this does mean that the returned frame can come from slightly before the moment of the capture request, by up to a
frame period. If this behaviour is not wanted, please set the queue parameter to False. For example:
from picamera2 import Picamera2
picam2 = Picamera2()
preview_config = picam2.create_preview_configuration(queue=False)
但是当buffer_count=1的时候,或者是使用create_still_configuration API的时候,默认是没有queue的。
- stream configuration相关的参数
>>> from picamera2 import Picamera2
>>> picam2 = Picamera2()
>>> config = picam2.create_preview_configuration({"size": (808, 606)})
>>> config["main"]
{'format': 'XBGR8888', 'size': (808, 606)}
>>> picam2.align_configuration(config)
# Picamera2 has decided an 800x606 image will be more efficient.
>>> config["main"]
{'format': 'XBGR8888', 'size': (800, 606)}
>>> picam2.configure(config)
{'format': 'XBGR8888', 'size': (800, 606), 'stride': 3200, 'framesize': 1939200}
上面要说的是align_configuration。当我们传入size是(808, 606)的时候,我们可以通过调用align_configuration,这个API会自动帮我们调整参数,以达到更少的内存拷贝。
- 图像格式
下面介绍的这几种是最常用的图像格式,当然picamera2还支持很多其他的。
XBGR8888 - every pixel is packed into 32-bits, with a dummy 255 value at the end, so a pixel would look like [R, G, B,
255] when captured in Python. (These format descriptions can seem counter-intuitive, but the underlying
infrastructure tends to take machine endianness into account, which can mix things up!)
• XRGB8888 - as above, with a pixel looking like [B, G, R, 255].
• RGB888 - 24 bits per pixel, ordered [B, G, R].
• BGR888 - as above, but ordered [R, G, B].
• YUV420 - YUV images with a plane of Y values followed by a quarter plane of U values and then a quarter plane of V
values
对于lores stream来说,只支持YUV420格式。
- raw图的streams
raw图因为不经过ISP,很多参数是没法对其配置的。但是我们可以通过sensor_modesAPI来获取其相关信息,也可以通过sensor_modes来控制其部分参数。
In [1]: from pprint import *

In [2]: from picamera2 import Picamera2

In [3]: picam2=Picamera2()
[0:08:31.051084026] [2701]  INFO Camera camera_manager.cpp:284 libcamera v0.1.0+52-a858d20b
[0:08:31.145223328] [2709]  WARN RPiSdn sdn.cpp:39 Using legacy SDN tuning - please consider moving SDN inside rpi.denoise
[0:08:31.147777127] [2709]  INFO RPI vc4.cpp:387 Registered camera /base/soc/i2c0mux/i2c@1/imx708@1a to Unicam device /dev/media1 and ISP device /dev/media2

In [4]: pprint(picam2.sensor_modes)
{'format': 'SRGGB10_CSI2P', 'size': (1536, 864)} 0.0
{'format': 'SRGGB10_CSI2P', 'size': (2304, 1296)} 300.0
{'format': 'SRGGB10_CSI2P', 'size': (4608, 2592)} 1200.0
[0:08:56.265572158] [2701]  INFO Camera camera.cpp:1213 configuring streams: (0) 640x480-XBGR8888 (1) 1536x864-SBGGR10_CSI2P
[0:08:56.266801311] [2709]  INFO RPI vc4.cpp:549 Sensor: /base/soc/i2c0mux/i2c@1/imx708@1a - Selected sensor format: 1536x864-SBGGR10_1X10 - Selected unicam format: 1536x864-pBAA
{'format': 'SRGGB10_CSI2P', 'size': (1536, 864)} 2400.0
{'format': 'SRGGB10_CSI2P', 'size': (2304, 1296)} 0.0
{'format': 'SRGGB10_CSI2P', 'size': (4608, 2592)} 900.0
[0:08:56.309407392] [2701]  INFO Camera camera.cpp:1213 configuring streams: (0) 640x480-XBGR8888 (1) 2304x1296-SBGGR10_CSI2P
[0:08:56.310407433] [2709]  INFO RPI vc4.cpp:549 Sensor: /base/soc/i2c0mux/i2c@1/imx708@1a - Selected sensor format: 2304x1296-SBGGR10_1X10 - Selected unicam format: 2304x1296-pBAA
{'format': 'SRGGB10_CSI2P', 'size': (1536, 864)} 9600.0
{'format': 'SRGGB10_CSI2P', 'size': (2304, 1296)} 7200.0
{'format': 'SRGGB10_CSI2P', 'size': (4608, 2592)} 0.0
[0:08:56.343605736] [2701]  INFO Camera camera.cpp:1213 configuring streams: (0) 640x480-XBGR8888 (1) 4608x2592-SBGGR10_CSI2P
[0:08:56.344595832] [2709]  INFO RPI vc4.cpp:549 Sensor: /base/soc/i2c0mux/i2c@1/imx708@1a - Selected sensor format: 4608x2592-SBGGR10_1X10 - Selected unicam format: 4608x2592-pBAA
[{'bit_depth': 10,
  'crop_limits': (768, 432, 3072, 1728),
  'exposure_limits': (9, None),
  'format': SRGGB10_CSI2P,
  'fps': 120.13,
  'size': (1536, 864),
  'unpacked': 'SRGGB10'},
 {'bit_depth': 10,
  'crop_limits': (0, 0, 4608, 2592),
  'exposure_limits': (13, 77208384, None),
  'format': SRGGB10_CSI2P,
  'fps': 56.03,
  'size': (2304, 1296),
  'unpacked': 'SRGGB10'},
 {'bit_depth': 10,
  'crop_limits': (0, 0, 4608, 2592),
  'exposure_limits': (26, 112015443, None),
  'format': SRGGB10_CSI2P,
  'fps': 14.35,
  'size': (4608, 2592),
  'unpacked': 'SRGGB10'}]

In [5]: pprint(picam2.sensor_modes[2])
{'bit_depth': 10,
 'crop_limits': (0, 0, 4608, 2592),
 'exposure_limits': (26, 112015443, None),
 'format': SRGGB10_CSI2P,
 'fps': 14.35,
 'size': (4608, 2592),
 'unpacked': 'SRGGB10'}
从这个信息里面,我们可以得到raw图的相关信息,包括bit_width, 裁剪尺寸,曝光限制,图像格式,fps等等的信息。其中,exposure_limits中分别表示最小和最大曝光时间,单位是微秒。
对于raw图的控制,只有size和format可以生效,具体的代码如下:
config = picam2.create_preview_configuration({"size": (640, 480)}, raw=picam2.sensor_modes[2])
重点解释一下'format': SRGGB10_CSI2P,原文是这样说的:
For a raw stream, the format normally begins with an S, followed by four characters that indicate the Bayer order of
the sensor (the only exception to this is for raw monochrome sensors, which use the single letter R instead). Next is
a  number,  10  or  12  here,  which  is  the  number  of  bits  in  each  pixel  sample  sent  by  the  sensor  (some  sensors  may
have  eight-bit  modes  too).  Finally  there  may  be  the  characters  _CSI2P.  This  would  mean  that  the  pixel  data  will  be
packed  tightly  in  memory,  so  that  four  ten-bit  pixel  values  will  be  stored  in  every  five  bytes,  or  two  twelve-bit  pixel
values in every three bytes. When _CSI2P is absent, it means the pixels will each be unpacked into a 16-bit word (or
eight-bit pixels into a single byte). This uses more memory but can be useful for applications that want easy access
to the raw pixel data
总结如下:
有 _CSI2P:
数据被称为"紧凑型",表示多个像素值被有效地打包到相对较小的内存块中。
对于十位的像素值,描述了四个十位像素值会被存储在每五个字节中。
对于十二位的像素值,描述了两个十二位像素值会被存储在每三个字节中。

没有 _CSI2P:
数据被称为"未打包"或"解包",表示每个像素值占用更多的内存。
每个像素值通常会占用一个较大的内存块,例如十位像素值可能占用一个16位的字(两个字节),八位像素值可能占用一个字节。

总的来说,有 _CSI2P 的情况下,数据被更有效地压缩,但在处理时可能需要进行更多的位运算或解包操作。而没有 _CSI2P 的情况下,每个像素占用的内存更多,但数据的处理可能更为简单。
- 面向对象类型的配置方式
from picamera2 import Picamera2
picam2 = Picamera2()
picam2.preview_configuration.main.size = (808, 600)
picam2.preview_configuration.main.format = "YUV420"
picam2.preview_configuration.align()
picam2.configure("preview")
就相当于我们之前的
create_preview_configuration({})
的方式,这里甚至我们之前用到的picam2.align_configuration(config),可以直接通过.align()完成。
- 对相机运行时参数的控制和修改
可以通过使用.camera_controlsAPI来获取所有可运行时修改的相机参数。返回值是其可修改的keys以及他们的数值范围(min, max, default)。
In [6]: picam2.camera_controls
Out[6]:
{'LensPosition': (0.0, 32.0, 1.0),
 'AnalogueGain': (1.1228070259094238, 16.0, None),
 'ScalerCrop': ((0, 0, 64, 64), (0, 0, 4608, 2592), (576, 0, 3456, 2592)),
 'AeConstraintMode': (0, 3, 0),
 'FrameDurationLimits': (69669, 220535845, None),
 'ExposureTime': (26, 112015443, None),
 'AfPause': (0, 2, 0),
 'AeEnable': (False, True, None),
 'AfMode': (0, 2, 0),
 'NoiseReductionMode': (0, 4, 0),
 'ColourGains': (0.0, 32.0, None),
 'AfMetering': (0, 1, 0),
 'AfSpeed': (0, 1, 0),
 'AfRange': (0, 2, 0),
 'Sharpness': (0.0, 16.0, 1.0),
 'AwbEnable': (False, True, None),
 'Contrast': (0.0, 32.0, 1.0),
 'Saturation': (0.0, 32.0, 1.0),
 'AfWindows': ((0, 0, 0, 0), (65535, 65535, 65535, 65535), (0, 0, 0, 0)),
 'Brightness': (-1.0, 1.0, 0.0),
 'AeFlickerPeriod': (100, 1000000, None),
 'ExposureValue': (-8.0, 8.0, 0.0),
 'AeExposureMode': (0, 3, 0),
 'AfTrigger': (0, 1, 0),
 'AwbMode': (0, 7, 0),
 'AeMeteringMode': (0, 3, 0),
 'AeFlickerMode': (0, 1, 0)}
- 自动对焦
自动对焦不是每款camera都有的,我们使用的树莓派camera module3是有自动对焦功能的。
picamera2支持3种自动对焦模式:
• Manual - The lens will never move spontaneously, but the "LensPosition" control can be used to move the lens
"manually". The units for this control are dioptres (1 / distance in metres), so that zero can be used to denote
"infinity". The "LensPosition" can be monitored in the image metadata too, and will indicate when the lens has
reached the requested location.
• Auto - In this mode the "AfTrigger" control can be used to start an autofocus cycle. The "AfState" metadata that is
received with images can be inspected to determine when this finishes and whether it was successful, though we
recommend the use of helper functions that save the user from having to implement this. In this mode too, the lens
will never move spontaneously until it is "triggered" by the application.
• Continuous - The autofocus algorithm will run continuously, and refocus spontaneously when necessary.
下面是示例代码:
置于continuous Autofocus模式
from picamera2 import Picamera2
from libcamera import controls
picam2 = Picamera2()
picam2.start(show_preview=True)
picam2.set_controls({"AfMode": controls.AfModeEnum.Continuous})
置于手动对焦模式
from picamera2 import Picamera2
from libcamera import controls
picam2 = Picamera2()
picam2.start(show_preview=True)
picam2.set_controls({"AfMode": controls.AfModeEnum.Manual, "LensPosition": 0.0})
置于自动对焦模式,此模式下,当程序触发对焦时,相机才会去对焦,非常适合diy单反相机半按下拍摄键时去对焦的需求。
from picamera2 import Picamera2
from libcamera import controls
picam2 = Picamera2()
picam2.start(show_preview=True)
job = picam2.autofocus_cycle(wait=False)
# Now do some other things, and when you finally want to be sure the autofocus
# cycle is finished:
success = picam2.wait(job)
这里也提供个基于QT的自动对焦拍摄程序
#!/usr/bin/python3

from libcamera import controls
from PyQt5 import QtCore
from PyQt5.QtGui import QPalette
from PyQt5.QtWidgets import (QApplication, QCheckBox, QHBoxLayout, QLabel,
                             QPushButton, QVBoxLayout, QWidget)

from picamera2 import Picamera2
from picamera2.previews.qt import QGlPicamera2

STATE_AF = 0
STATE_CAPTURE = 1


def request_callback(request):
    label.setText(''.join(f"{k}: {v}\n" for k, v in request.get_metadata().items()))


picam2 = Picamera2()
picam2.post_callback = request_callback
# Adjust the preview size to match the sensor aspect ratio.
preview_width = 800
preview_height = picam2.sensor_resolution[1] * 800 // picam2.sensor_resolution[0]
preview_height -= preview_height % 2
preview_size = (preview_width, preview_height)
# We also want a full FoV raw mode, this gives us the 2x2 binned mode.
raw_size = tuple([v // 2 for v in picam2.camera_properties['PixelArraySize']])
preview_config = picam2.create_preview_configuration({"size": preview_size}, raw={"size": raw_size})
picam2.configure(preview_config)
if 'AfMode' not in picam2.camera_controls:
    print("Attached camera does not support autofocus")
    quit()
picam2.set_controls({"AfMode": controls.AfModeEnum.Auto})
app = QApplication([])


def on_button_clicked():
    global state
    button.setEnabled(False)
    continuous_checkbox.setEnabled(False)
    af_checkbox.setEnabled(False)
    state = STATE_AF if af_checkbox.isChecked() else STATE_CAPTURE
    if state == STATE_AF:
        picam2.autofocus_cycle(signal_function=qpicamera2.signal_done)
    else:
        do_capture()


def do_capture():
    cfg = picam2.create_still_configuration()
    picam2.switch_mode_and_capture_file(cfg, "test.jpg", signal_function=qpicamera2.signal_done)


def callback(job):
    global state
    if state == STATE_AF:
        state = STATE_CAPTURE
        success = "succeeded" if picam2.wait(job) else "failed"
        print(f"AF cycle {success} in {job.calls} frames")
        do_capture()
    else:
        picam2.wait(job)
        picam2.set_controls({"AfMode": controls.AfModeEnum.Auto})
        button.setEnabled(True)
        continuous_checkbox.setEnabled(True)
        af_checkbox.setEnabled(True)


def on_continuous_toggled(checked):
    mode = controls.AfModeEnum.Continuous if checked else controls.AfModeEnum.Auto
    picam2.set_controls({"AfMode": mode})


window = QWidget()
bg_colour = window.palette().color(QPalette.Background).getRgb()[:3]
qpicamera2 = QGlPicamera2(picam2, width=preview_width, height=preview_height, bg_colour=bg_colour)
qpicamera2.done_signal.connect(callback, type=QtCore.Qt.QueuedConnection)

button = QPushButton("Click to capture JPEG")
button.clicked.connect(on_button_clicked)
label = QLabel()
af_checkbox = QCheckBox("AF before capture", checked=False)
continuous_checkbox = QCheckBox("Continuous AF", checked=False)
continuous_checkbox.toggled.connect(on_continuous_toggled)
window.setWindowTitle("Qt Picamera2 App")

label.setFixedWidth(400)
label.setAlignment(QtCore.Qt.AlignTop)
layout_h = QHBoxLayout()
layout_v = QVBoxLayout()
layout_v.addWidget(label)
layout_v.addWidget(continuous_checkbox)
layout_v.addWidget(af_checkbox)
layout_v.addWidget(button)
layout_h.addWidget(qpicamera2, 80)
layout_h.addLayout(layout_v, 20)
window.resize(1200, preview_height + 80)
window.setLayout(layout_h)

picam2.start()
window.show()
app.exec()
picam2.stop()
- 关于捕获图像
picamera2的camera images通常以numpy array,PIL images和buffers的形式保存。
• arrays - these are two-dimensional arrays of pixels and are usually the most convenient way to manipulate images. They are often three-dimensional numpy arrays because every pixel has several colour components, adding another dimension. • images - this refers to Python Image Library (PIL) images and can be useful when interfacing to other modules that expect this format • buffers - by buffer we simply mean the entire block of memory where the image is stored as a one-dimensional numpy array, but the two- (or three-) dimensional array form is generally more useful
捕获array
from picamera2 import Picamera2
import time
picam2 = Picamera2()
picam2.start()
time.sleep(1)
array = picam2.capture_array("main")
array的shape有以下几种可能性:
• shape will report (height, width, 3) for 3 channel RGB type formats
• shape will report (height, width, 4) for 4 channel RGBA (alpha) type formats
• shape will report (height × 3 / 2, width) for YUV420 formats
YUv420 is a slightly special case because the first height rows give the Y channel, the next height/4 rows contain the U channel and the final height/4 rows contain the V channel. For the other formats, where there is an “alpha” value it will take the fixed value 255
在我的camera上面测试,shape是(480, 640, 4)
捕获PIL image
from picamera2 import Picamera2
import time
picam2 = Picamera2()
picam2.start()
time.sleep(1)
image = picam2.capture_image("main")
- 在预览和拍照模式之间转换
上面的例子种,我们获得的array shape是480*640的图像,分辨率是很低的,我们通常情况下,想在预览状态下用高framerate,低分辨率的图像,然后拍照的时候,用高分辨率的图像,picamera2的switch_mode_and_capture_array和switch_mode_and_capture_image正是上面说的效果。
from picamera2 import Picamera2
import time
picam2 = Picamera2()
capture_config = picam2.create_still_configuration()
picam2.start(show_preview=True)
time.sleep(1)
array = picam2.switch_mode_and_capture_array(capture_config, "main")
也可以切换到拍照模式,然后直接保存图片
from picamera2 import Picamera2
import time
picam2 = Picamera2()
capture_config = picam2.create_still_configuration()
picam2.start(show_preview=True)
time.sleep(1)
picam2.switch_mode_and_capture_file(capture_config, "image.jpg")
这里picamera2会使用PIL去保存图片,格式支持JPEG, BMP, PNG, GIF。
也可以使用python的IO去保存文件。
from picamera2 import Picamera2
import io
import time
picam2 = Picamera2()
picam2.start()
time.sleep(1)
data = io.BytesIO()
picam2.capture_file(data, format='jpeg')
- 设置图片质量

值得注意的是,最高质量的数值是95.
from picamera2 import Picamera2
import time
picam2 = Picamera2()
picam2.options["quality"] = 95
picam2.options["compress_level"] = 2
picam2.start()
time.sleep(1)
picam2.capture_file("test.jpg")
picam2.capture_file("test.png")
- 获得图片元属性
from picamera2 import Picamera2
picam2 = Picamera2()
picam2.start()
for i in range(30):
    metadata = picam2.capture_metadata()
    print("Frame", i, "has arrived")
这个功能在我们diy相机的时候,用于模仿相机的预览界面特别有用,在预览界面,我们要显示当前的光圈大小、快门时间、ISO、白平衡等很多参数。
也可以通过面向对象的方式来获得metadata
from picamera2 import Picamera2, Metadata
picam2 = Picamera2()
picam2.start()
metadata = Metadata(picam2.capture_metadata())
print(metadata.ExposureTime, metadata.AnalogueGain)
- 异步执行
from picamera2 import Picamera2
import time
picam2 = Picamera2()
still_config = picam2.create_still_configuration()
picam2.configure(picam2.create_preview_configuration())
picam2.start()
time.sleep(1)
job = picam2.switch_mode_and_capture_file(still_config, "test.jpg", wait=False)
# now we can do some other stuff...
for i in range(20):
    time.sleep(0.1)
    print(i)
# finally complete the operation:
metadata = picam2.wait(job)
picamera2的wait可以提供异步的支持,我们在执行picam2.switch_mode_and_capture_file的时候,也需要传入wait=False不让其阻塞。
- high level API的一些用法
from picamera2 import Picamera2
picam2 = Picamera2()
picam2.start_and_capture_files("test{:d}.jpg", initial_delay=0, delay=0, num_files=10)
这个用法可以在比如捕获HDR多帧的时候,挺有用。
- pixel formats和内存
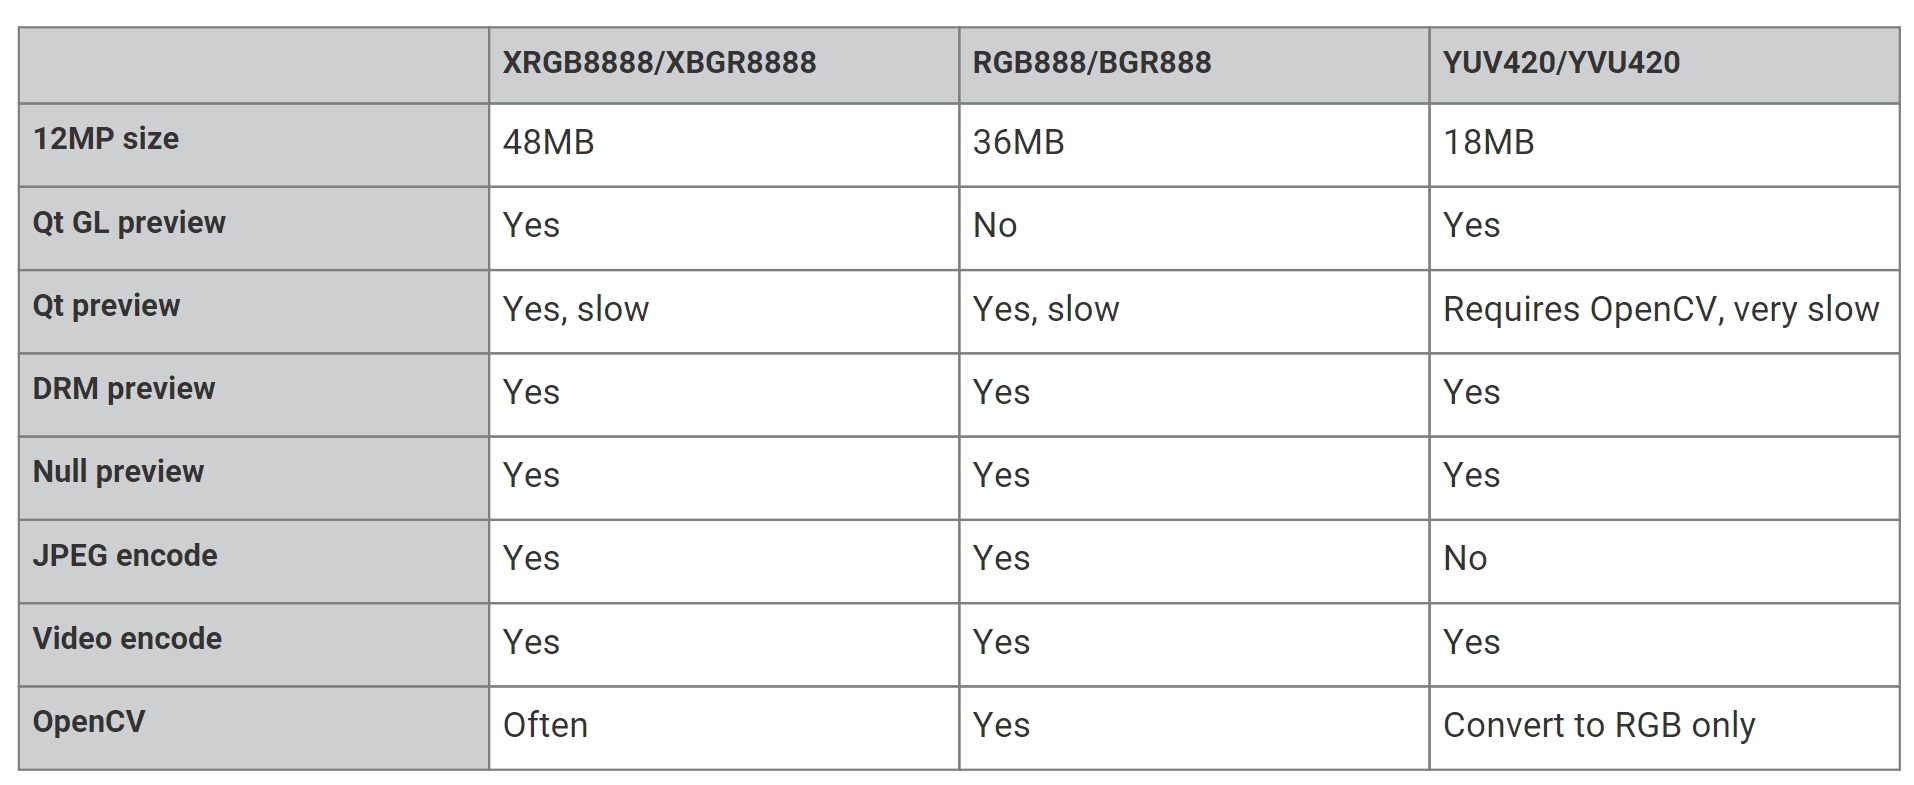
为了节省memory,我们可以使用yuv420格式
from picamera2 import Picamera2
import cv2
picam2 = Picamera2()
picam2.create_preview_configuration({"format": "YUV420"})
picam2.start()
yuv420 = picam2.capture_array()
rgb = cv2.cvtColor(yuv420, cv2.COLOR_YUV420p2RGB)
- qt
构建picamera2的程序,推荐使用QT来编写。下面是一个简单的例子
from PyQt5.QtWidgets import QApplication
from picamera2.previews.qt import QGlPicamera2
from picamera2 import Picamera2
picam2 = Picamera2()
picam2.configure(picam2.create_preview_configuration())
app = QApplication([])
qpicamera2 = QGlPicamera2(picam2, width=800, height=600, keep_ar=False)
qpicamera2.setWindowTitle("Qt Picamera2 App")
picam2.start()
qpicamera2.show()
app.exec()
Picamera2 provides two Qt widgets: • QGlPicamera2 - this is a Qt widget that renders the camera images using hardware acceleration through the Pi’s GPU. • QPicamera2 - a software rendered but otherwise equivalent widget. This version is much slower and the QGlPicamera2 should be preferred in nearly all circumstances except those where it does not work (for example, the application has to operate with a remote window through X forwarding).
- picamera2 public APIs在QT中使用时,一些注意事项。
Camera functions fall broadly into three types for the purposes of this discussion. There are:
Functions that return immediately and are safe to call
- Functions that have to wait for the camera event loop to do something before the operation is complete, so they must be called in a non-blocking manner, and
- Functions that should not be called at all.
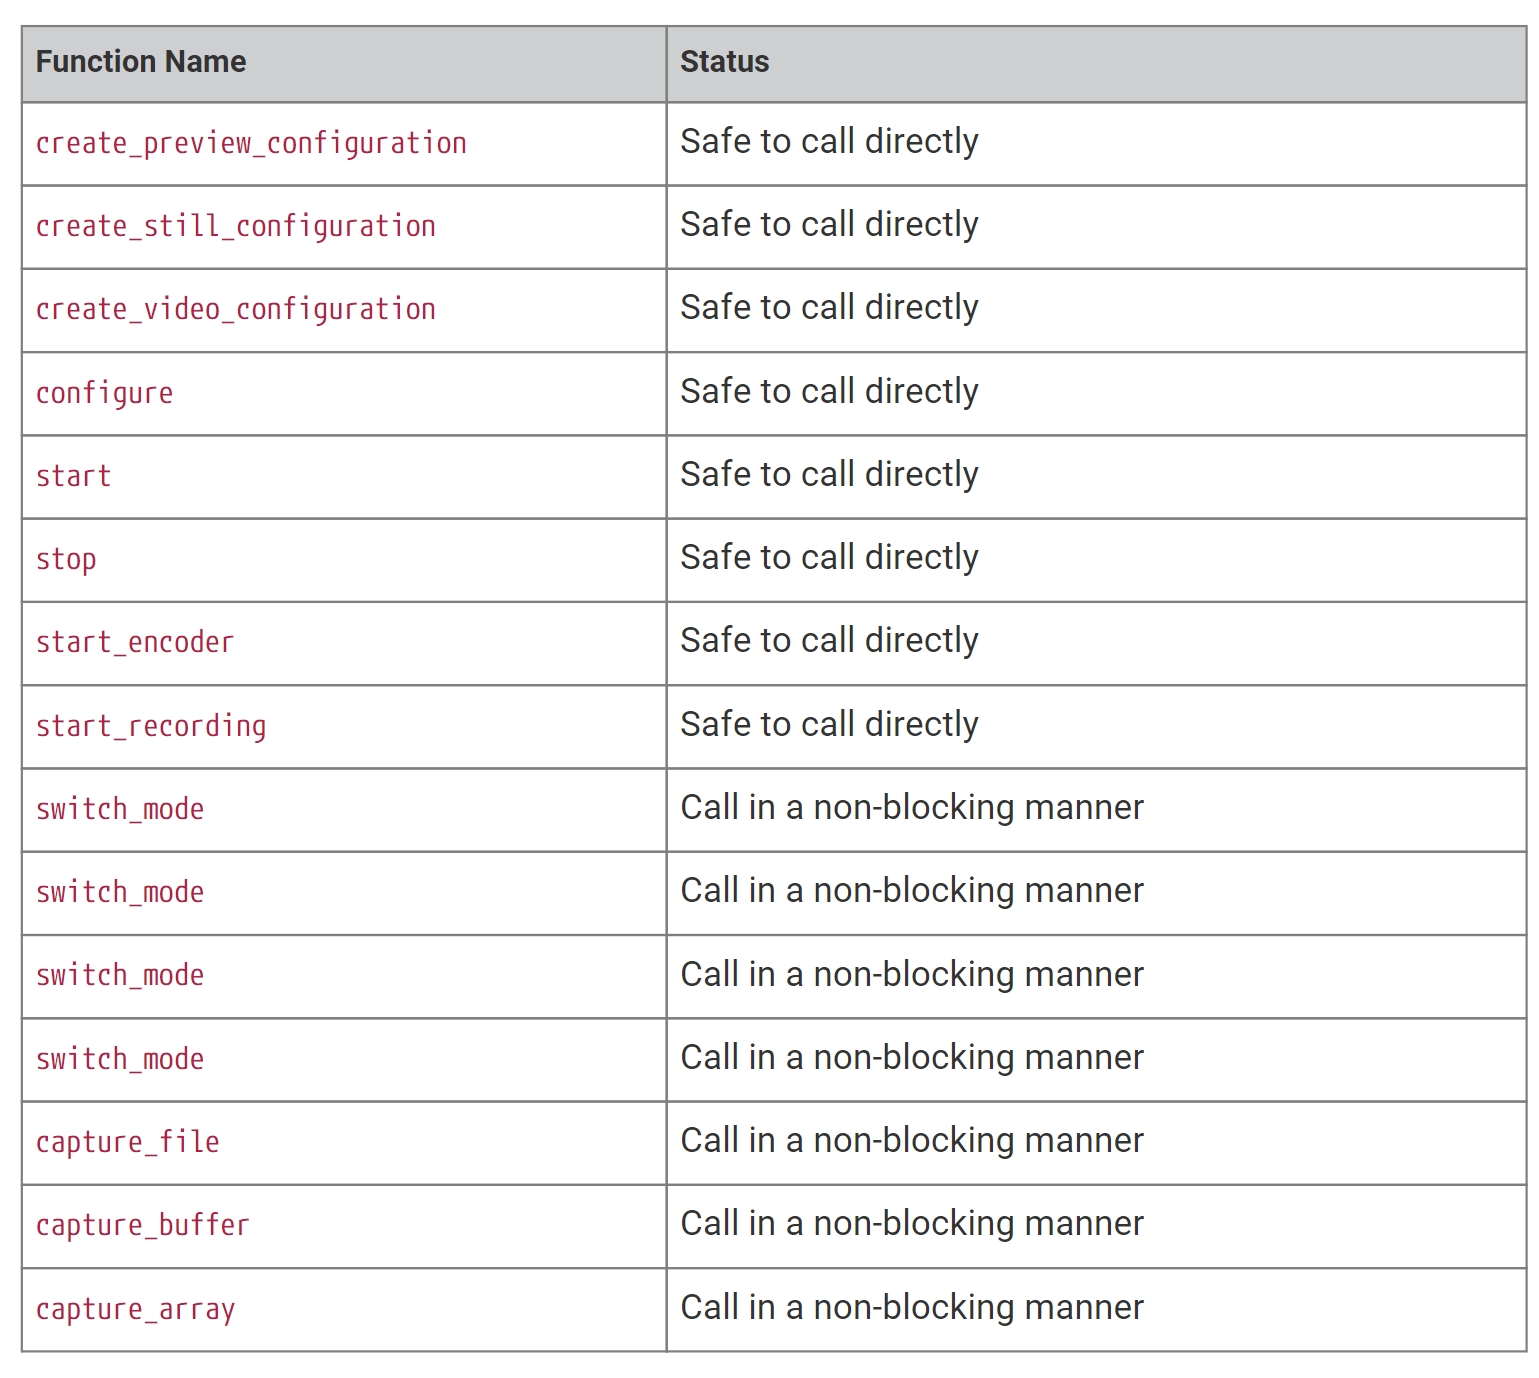
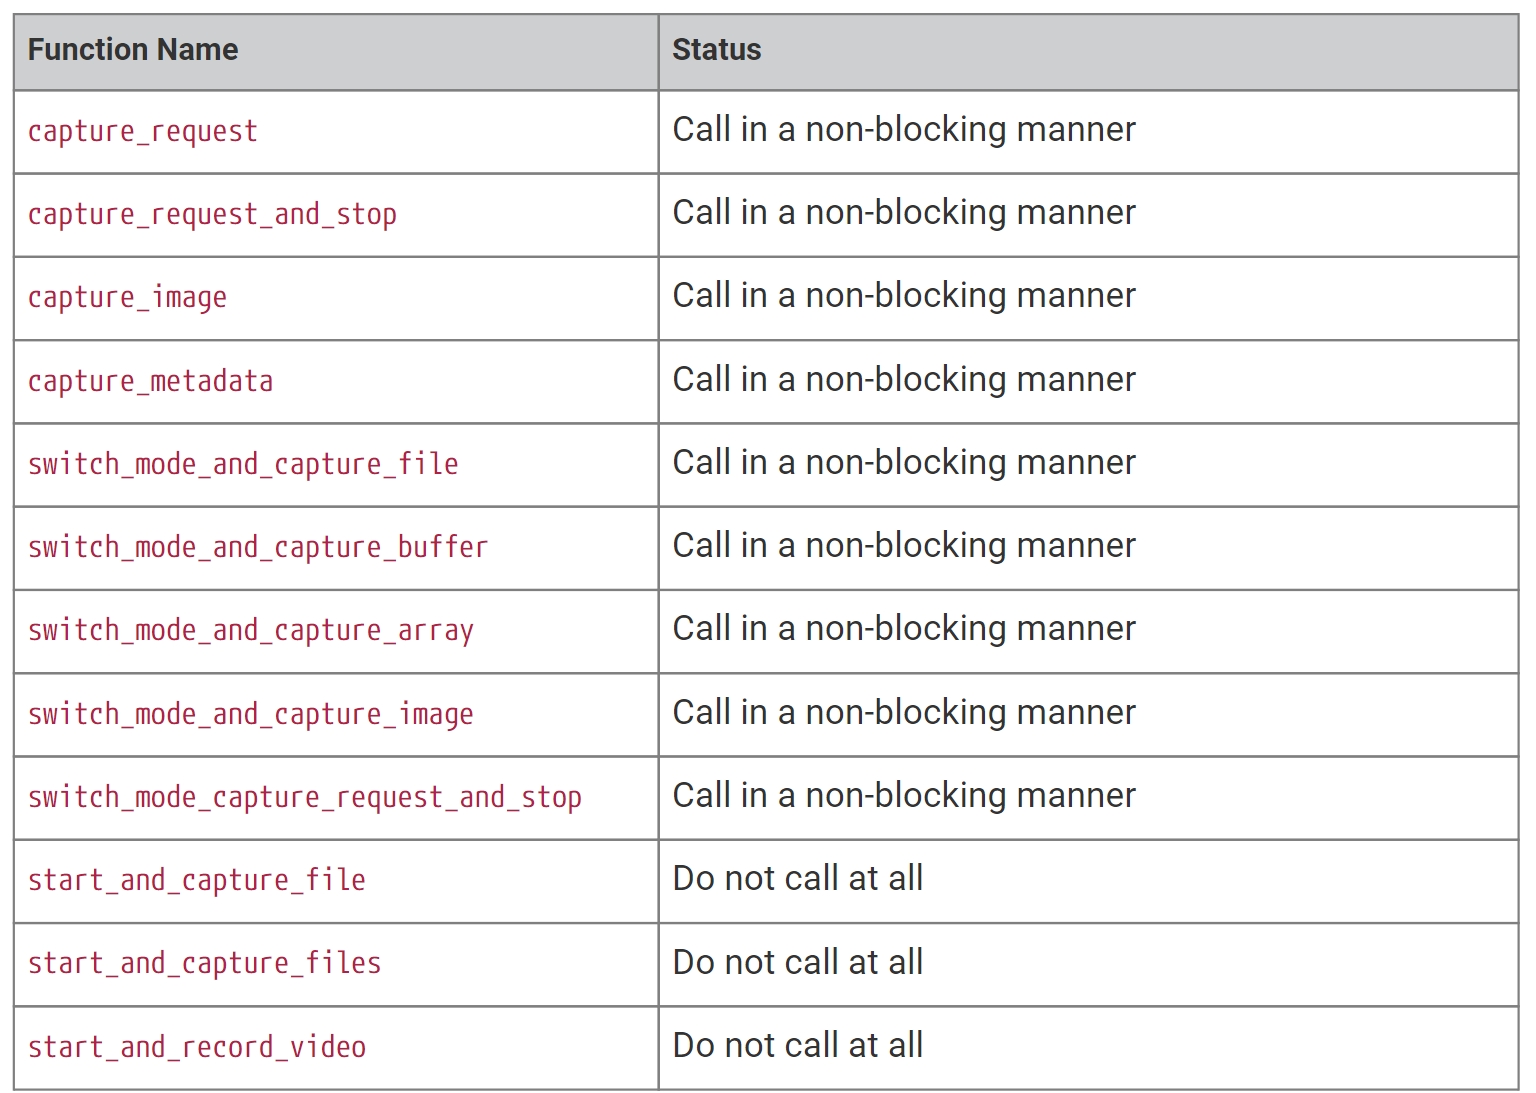
下面是一个example code
from PyQt5 import QtWidgets
from PyQt5.QtWidgets import QPushButton, QVBoxLayout, QApplication, QWidget
from picamera2.previews.qt import QGlPicamera2
from picamera2 import Picamera2
picam2 = Picamera2()
picam2.configure(picam2.create_preview_configuration())
def on_button_clicked():
    button.setEnabled(False)
    cfg = picam2.create_still_configuration()
    picam2.switch_mode_and_capture_file(cfg, "test.jpg", signal_function=qpicamera2.signal_done)
def capture_done(job):
    result = picam2.wait(job)
    button.setEnabled(True)
app = QApplication([])
qpicamera2 = QGlPicamera2(picam2, width=800, height=600, keep_ar=False)
button = QPushButton("Click to capture JPEG")
window = QWidget()
qpicamera2.done_signal.connect(capture_done)
button.clicked.connect(on_button_clicked)
layout_v = QVBoxLayout()
layout_v.addWidget(qpicamera2)
layout_v.addWidget(button)
window.setWindowTitle("Qt Picamera2 App")
window.resize(640, 480)
window.setLayout(layout_v)
picam2.start()
window.show()
app.exec()
- 虚拟环境的问题
创建虚拟环境时,我们需要使用--system-site-packages选项,原因如下。
ython virtual environments should be created in such a way as to include your site packages. This is because the libcamera Python bindings are not available through PyPI so you can’t install them explicitly afterwards. The correct command to do this would be: python -m venv --system-site-packages my-env which would create a virtual environment named my-env
- 开启HDR模式
树莓派camera module3,也就是我们使用的这款camera,是有HDR功能的,但是开启有些麻烦。
The Raspberry Pi Camera Module 3 implements an HDR (High Dynamic Range) camera mode. Unfortunately V4L2 (the Linux video/camera kernel interface) does not readily support this kind of camera, where the sensor itself has HDR and non-HDR modes. For the moment, therefore, activating (or de-activating) the HDR mode has to be handled outside the camera system itself. To enable the HDR mode, please type the following into a terminal window before starting Picamera2: v4l2-ctl --set-ctrl wide_dynamic_range=1 -d /dev/v4l-subdev0 To disable the HDR mode, please type the following into a terminal window before starting Picamera2: v4l2-ctl --set-ctrl wide_dynamic_range=0 -d /dev/v4l-subdev0 (Note that you may have to use a different sub-device other than v4l-subdev0 if you have multiple cameras attached.)
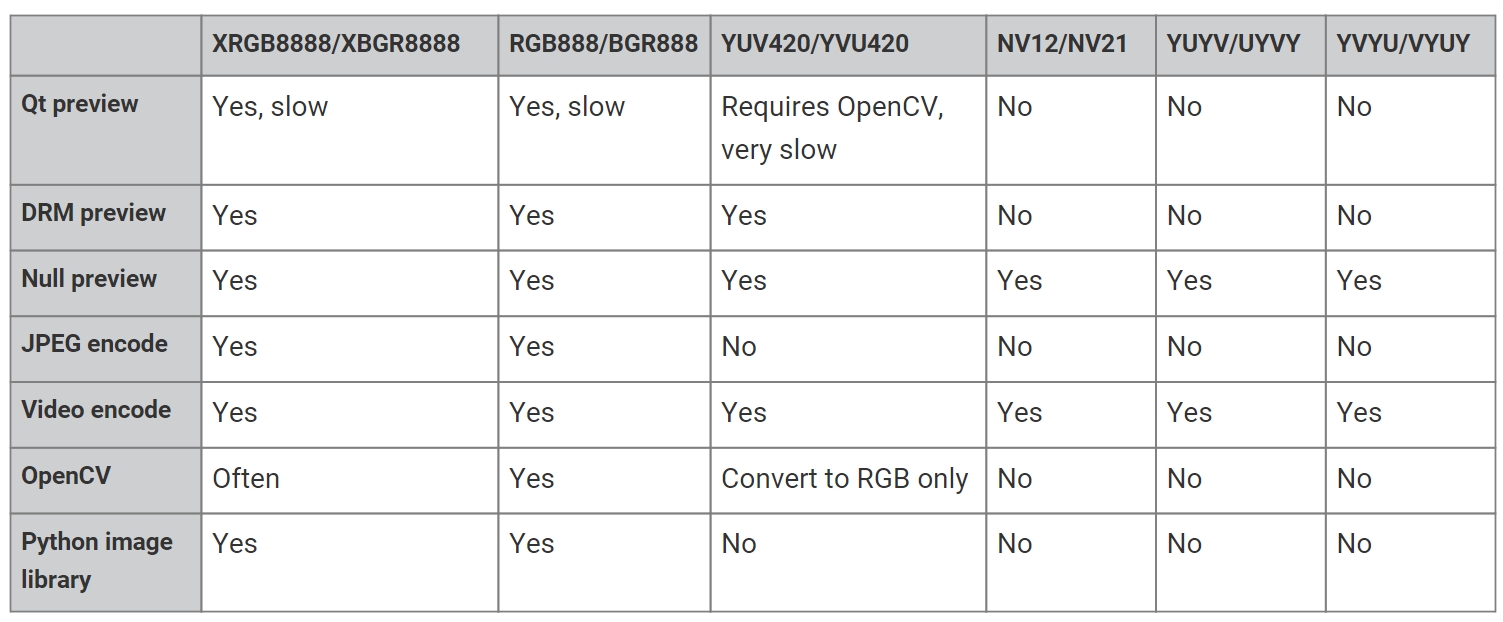
- 图片的数据类型总结
![]()
以及picamera2对各图片类型的支持

