使用jetson nano进行YOLOv4-tiny深度学习模型部署
Published:
使用jetson nano进行深度学习模型部署的过程,本文基于Pytorch。
1.安装pytorch
在jetson nano上配置深度学习环境建议直接使用系统环境,nvidia官方针对系统环境放出了对应的pytorch二进制包。笔者在使用conda的过程中,遇到了很多小的问题。(jetson nano上可以使用miniforge作为conda管理软件)
详细过程笔者参考的此网站PyTorch for Jetson - version 1.10 now available,nvidia官方已经制作了应用于jetson系列产品的pytorch二进制包,按照说明安装即可。目前jetpack4.4、4.5、4.6系统自带的python都是python2.7和python3.6,可以使用指令ls -l /usr/bin/python*查看,例如笔者的结果是
lrwxrwxrwx 1 root root       9 4月  16  2018 /usr/bin/python -> python2.7
lrwxrwxrwx 1 root root       9 4月  16  2018 /usr/bin/python2 -> python2.7
-rwxr-xr-x 1 root root 3273520 2月  27  2021 /usr/bin/python2.7
lrwxrwxrwx 1 root root      34 2月  27  2021 /usr/bin/python2.7-config -> aarch64-linux-gnu-python2.7-config
lrwxrwxrwx 1 root root      16 4月  16  2018 /usr/bin/python2-config -> python2.7-config
lrwxrwxrwx 1 root root       9 10月 25  2018 /usr/bin/python3 -> python3.6
-rwxr-xr-x 2 root root 4513264 12月  9 05:08 /usr/bin/python3.6
lrwxrwxrwx 1 root root      34 12月  9 05:08 /usr/bin/python3.6-config -> aarch64-linux-gnu-python3.6-config
-rwxr-xr-x 2 root root 4513264 12月  9 05:08 /usr/bin/python3.6m
lrwxrwxrwx 1 root root      35 12月  9 05:08 /usr/bin/python3.6m-config -> aarch64-linux-gnu-python3.6m-config
lrwxrwxrwx 1 root root      16 10月 25  2018 /usr/bin/python3-config -> python3.6-config
lrwxrwxrwx 1 root root      10 10月 25  2018 /usr/bin/python3m -> python3.6m
lrwxrwxrwx 1 root root      17 10月 25  2018 /usr/bin/python3m-config -> python3.6m-config
lrwxrwxrwx 1 root root      16 4月  16  2018 /usr/bin/python-config -> python2.7-config
在安装之前,更新pip到最新版本。
pip install -U pip  #python2-pip
pip3 install -U pip #python3-pip
笔者的jetpack版本是jetpack4.6。查看jetpack版本可以使用指令sudo apt-cache show nvidia-jetpack或者使用jtop查看,jtop为jetson平台的类似x86平台的htop软件,安装jtop的方式为sudo pip3 install jetson-stats,之后在终端执行jtop可以看到系统资源使用及jetpack版本。
为了方便使用,笔者重复一遍上述网址执行的指令。
(1)安装pytorch
- python3.6版本的pytorch
wget https://nvidia.box.com/shared/static/p57jwntv436lfrd78inwl7iml6p13fzh.whl -O torch-1.8.0-cp36-cp36m-linux_aarch64.whl
sudo apt-get install python3-pip libopenblas-base libopenmpi-dev
pip3 install Cython
pip3 install numpy torch-1.8.0-cp36-cp36m-linux_aarch64.whl
将上面的torch-1.8.0-cp36-cp36m-linux_aarch64.whl替换为自己想要安装的版本,不同的jetpack版本对应不同的pytorch版本,具体可查阅上述网址。对于jetpack4.6来说,可安装pytorch1.6.0到1.10.0的任意版本。
如果执行wget过程中由于网络原因超时,可以使用翻墙了的电脑从上述网址中下载torch-1.8.0-cp36-cp36m-linux_aarch64.whl,然后传到jetson nano上,将wget https://nvidia.box.com/shared/static/p57jwntv436lfrd78inwl7iml6p13fzh.whl -O torch-1.8.0-cp36-cp36m-linux_aarch64.whl替换为pip3 install torch-1.8.0-cp36-cp36m-linux_aarch64.whl,之后的安装过程相同。
- python2.7版本的pytorch
wget https://nvidia.box.com/shared/static/1v2cc4ro6zvsbu0p8h6qcuaqco1qcsif.whl -O torch-1.4.0-cp27-cp27mu-linux_aarch64.whl
sudo apt-get install libopenblas-base libopenmpi-dev
pip install future torch-1.4.0-cp27-cp27mu-linux_aarch64.whl
(2)安装torchvision
$ sudo apt-get install libjpeg-dev zlib1g-dev libpython3-dev libavcodec-dev libavformat-dev libswscale-dev
$ git clone --branch <version> https://github.com/pytorch/vision torchvision   # see below for version of torchvision to download
$ cd torchvision
$ export BUILD_VERSION=0.x.0  # where 0.x.0 is the torchvision version
$ python3 setup.py install --user
$ cd ../  # attempting to load torchvision from build dir will result in import error
$ pip install 'pillow<7' # always needed for Python 2.7, not needed torchvision v0.5.0+ with Python 3.6
上面的version等需要替换为具体的torchvision版本号,torchvision与pytorch版本对应为
PyTorch v1.0 - torchvision v0.2.2
PyTorch v1.1 - torchvision v0.3.0
PyTorch v1.2 - torchvision v0.4.0
PyTorch v1.3 - torchvision v0.4.2
PyTorch v1.4 - torchvision v0.5.0
PyTorch v1.5 - torchvision v0.6.0
PyTorch v1.6 - torchvision v0.7.0
PyTorch v1.7 - torchvision v0.8.1
PyTorch v1.8 - torchvision v0.9.0
PyTorch v1.9 - torchvision v0.10.0
PyTorch v1.10 - torchvision v0.11.1
(3)验证安装
>>> import torch
>>> print(torch.__version__)
>>> print('CUDA available: ' + str(torch.cuda.is_available()))
>>> print('cuDNN version: ' + str(torch.backends.cudnn.version()))
>>> a = torch.cuda.FloatTensor(2).zero_()
>>> print('Tensor a = ' + str(a))
>>> b = torch.randn(2).cuda()
>>> print('Tensor b = ' + str(b))
>>> c = a + b
>>> print('Tensor c = ' + str(c))

>>> import torchvision
>>> print(torchvision.__version__)
2.扩容swap分区
jetson nano默认是4GB的内存和2GB的swap分区,如果要运行更多的深度学习模型,可以考虑扩容swap分区,将swap扩展为8GB。在后面运行将onnx转换为tensorrt engine的程序时,如果内存不够,可能会遇到process "Killed" by Linux kernel错误,因此增加一些交换分区也是有必要的。
系统原先已有2GB的swap,只需要再添加6GB即可。
sudo fallocate -l 6G /mnt/6GB.swap
sudo mkswap /mnt/6GB.swap
sudo swapon /mnt/6GB.swap
sudo echo "/mnt/6GB.swap none swap sw 0 0" >> /etc/fstab
重启系统。
3.使用{tensorrt demos](https://github.com/jkjung-avt/tensorrt_demos)运行标准模型
下文列出的安装过程请参考tensorrt demos代码仓库的说明,下文的安装过程对其说明中一些安装会出错的安装步骤进行了修正。
(1)克隆tensorrt demos代码到本地
cd
git clone https://github.com/jkjung-avt/tensorrt_demos.git
(2)安装pycuda
cd tensorrt_demos/yolo
./install_pycuda.sh
(3)安装onnx
sudo apt update
sudo apt-get install python3-pip
sudo apt-get install cmake libprotobuf-dev protobuf-compiler
python3 -m pip install Cython
python3 -m pip install onnx==1.4.1
(4)编译yolo_layer插件
cd
cd tensorrt_demos/plugins
make
(5)下载预训练的yolov4 COCO模型,将其转换为onnx,然后转换为tensorrt engine
tensorrt_demos/yolo/download_yolo.sh文件将会下载yolov3、yolov4所有模型的配置文件和权重文件,将会特别耗费时间。为此,本文仅使用yolov4-tiny 416模型,因此将其他的下载任务注释掉。
cd && cd tensorrt_demos/yolo
vi download_yolo.sh
仅保留其中yolov4相关的下载。
#!/bin/bash

set -e
#
## yolov3-tiny
#wget https://raw.githubusercontent.com/AlexeyAB/darknet/master/cfg/yolov3-tiny.cfg -q --show-progress --no-clobber
#wget https://pjreddie.com/media/files/yolov3-tiny.weights -q --show-progress --no-clobber
#
## yolov3
#wget https://raw.githubusercontent.com/pjreddie/darknet/master/cfg/yolov3.cfg -q --show-progress --no-clobber
#wget https://pjreddie.com/media/files/yolov3.weights -q --show-progress --no-clobber
#
## yolov3-spp
#wget https://raw.githubusercontent.com/AlexeyAB/darknet/master/cfg/yolov3-spp.cfg -q --show-progress --no-clobber
#wget https://pjreddie.com/media/files/yolov3-spp.weights -q --show-progress --no-clobber
#
# yolov4-tiny
wget https://raw.githubusercontent.com/AlexeyAB/darknet/master/cfg/yolov4-tiny.cfg -q --show-progress --no-clobber
wget https://github.com/AlexeyAB/darknet/releases/download/darknet_yolo_v4_pre/yolov4-tiny.weights -q --show-progress --no-clobber

## yolov4
#wget https://raw.githubusercontent.com/AlexeyAB/darknet/master/cfg/yolov4.cfg -q --show-progress --no-clobber
#wget https://github.com/AlexeyAB/darknet/releases/download/darknet_yolo_v3_optimal/yolov4.weights -q --show-progress --no-clobber
#
## yolov4-csp
#wget https://raw.githubusercontent.com/AlexeyAB/darknet/master/cfg/yolov4-csp.cfg -q --show-progress --no-clobber
#wget https://github.com/AlexeyAB/darknet/releases/download/darknet_yolo_v4_pre/yolov4-csp.weights -q --show-progress --no-clobber
#
## yolov4x-mish
#wget https://raw.githubusercontent.com/AlexeyAB/darknet/master/cfg/yolov4x-mish.cfg -q --show-progress --no-clobber
#wget https://github.com/AlexeyAB/darknet/releases/download/darknet_yolo_v4_pre/yolov4x-mish.weights -q --show-progress --no-clobber
#
## yolov4-p5
#wget https://raw.githubusercontent.com/AlexeyAB/darknet/master/cfg/yolov4-p5.cfg -q --show-progress --no-clobber
#wget https://github.com/AlexeyAB/darknet/releases/download/darknet_yolo_v4_pre/yolov4-p5.weights -q --show-progress --no-clobber
#
#echo
#echo "Creating yolov3-tiny-288.cfg and yolov3-tiny-288.weights"
#cat yolov3-tiny.cfg | sed -e '8s/width=416/width=288/' | sed -e '9s/height=416/height=288/' > yolov3-tiny-288.cfg
#echo >> yolov3-tiny-288.cfg
#ln -sf yolov3-tiny.weights yolov3-tiny-288.weights
#echo "Creating yolov3-tiny-416.cfg and yolov3-tiny-416.weights"
#cp yolov3-tiny.cfg yolov3-tiny-416.cfg
#echo >> yolov3-tiny-416.cfg
#ln -sf yolov3-tiny.weights yolov3-tiny-416.weights
#
#echo "Creating yolov3-288.cfg and yolov3-288.weights"
#cat yolov3.cfg | sed -e '8s/width=608/width=288/' | sed -e '9s/height=608/height=288/' > yolov3-288.cfg
#ln -sf yolov3.weights yolov3-288.weights
#echo "Creating yolov3-416.cfg and yolov3-416.weights"
#cat yolov3.cfg | sed -e '8s/width=608/width=416/' | sed -e '9s/height=608/height=416/' > yolov3-416.cfg
#ln -sf yolov3.weights yolov3-416.weights
#echo "Creating yolov3-608.cfg and yolov3-608.weights"
#cp yolov3.cfg yolov3-608.cfg
#ln -sf yolov3.weights yolov3-608.weights
#
#echo "Creating yolov3-spp-288.cfg and yolov3-spp-288.weights"
#cat yolov3-spp.cfg | sed -e '8s/width=608/width=288/' | sed -e '9s/height=608/height=288/' > yolov3-spp-288.cfg
#ln -sf yolov3-spp.weights yolov3-spp-288.weights
#echo "Creating yolov3-spp-416.cfg and yolov3-spp-416.weights"
#cat yolov3-spp.cfg | sed -e '8s/width=608/width=416/' | sed -e '9s/height=608/height=416/' > yolov3-spp-416.cfg
#ln -sf yolov3-spp.weights yolov3-spp-416.weights
#echo "Creating yolov3-spp-608.cfg and yolov3-spp-608.weights"
#cp yolov3-spp.cfg yolov3-spp-608.cfg
#ln -sf yolov3-spp.weights yolov3-spp-608.weights
#
echo "Creating yolov4-tiny-288.cfg and yolov4-tiny-288.weights"
cat yolov4-tiny.cfg | sed -e '6s/batch=64/batch=1/' | sed -e '8s/width=416/width=288/' | sed -e '9s/height=416/height=288/' > yolov4-tiny-288.cfg
echo >> yolov4-tiny-288.cfg
ln -sf yolov4-tiny.weights yolov4-tiny-288.weights
echo "Creating yolov4-tiny-416.cfg and yolov4-tiny-416.weights"
cat yolov4-tiny.cfg | sed -e '6s/batch=64/batch=1/' > yolov4-tiny-416.cfg
echo >> yolov4-tiny-416.cfg
ln -sf yolov4-tiny.weights yolov4-tiny-416.weights
#
#echo "Creating yolov4-288.cfg and yolov4-288.weights"
#cat yolov4.cfg | sed -e '2s/batch=64/batch=1/' | sed -e '7s/width=608/width=288/' | sed -e '8s/height=608/height=288/' > yolov4-288.cfg
#ln -sf yolov4.weights yolov4-288.weights
#echo "Creating yolov4-416.cfg and yolov4-416.weights"
#cat yolov4.cfg | sed -e '2s/batch=64/batch=1/' | sed -e '7s/width=608/width=416/' | sed -e '8s/height=608/height=416/' > yolov4-416.cfg
#ln -sf yolov4.weights yolov4-416.weights
#echo "Creating yolov4-608.cfg and yolov4-608.weights"
#cat yolov4.cfg | sed -e '2s/batch=64/batch=1/' > yolov4-608.cfg
#ln -sf yolov4.weights yolov4-608.weights
#
#echo "Creating yolov4-csp-256.cfg and yolov4-csp-256.weights"
#cat yolov4-csp.cfg | sed -e '6s/batch=64/batch=1/' | sed -e '8s/width=512/width=256/' | sed -e '9s/height=512/height=256/' > yolov4-csp-256.cfg
#ln -sf yolov4-csp.weights yolov4-csp-256.weights
#echo "Creating yolov4-csp-512.cfg and yolov4x-csp-512.weights"
#cat yolov4-csp.cfg | sed -e '6s/batch=64/batch=1/' > yolov4-csp-512.cfg
#ln -sf yolov4-csp.weights yolov4-csp-512.weights
#
#echo "Creating yolov4x-mish-320.cfg and yolov4x-mish-320.weights"
#cat yolov4x-mish.cfg | sed -e '6s/batch=64/batch=1/' | sed -e '8s/width=640/width=320/' | sed -e '9s/height=640/height=320/' > yolov4x-mish-320.cfg
#ln -sf yolov4x-mish.weights yolov4x-mish-320.weights
#echo "Creating yolov4x-mish-640.cfg and yolov4x-mish-640.weights"
#cat yolov4x-mish.cfg | sed -e '6s/batch=64/batch=1/' > yolov4x-mish-640.cfg
#ln -sf yolov4x-mish.weights yolov4x-mish-640.weights
#
#echo "Creating yolov4-p5-448.cfg and yolov4-p5-448.weights"
#cat yolov4-p5.cfg | sed -e '6s/batch=64/batch=1/' | sed -e '8s/width=896/width=448/' | sed -e '9s/height=896/height=448/' > yolov4-p5-448.cfg
#ln -sf yolov4-p5.weights yolov4-p5-448.weights
#echo "Creating yolov4-p5-896.cfg and yolov4-p5-896.weights"
#cat yolov4-p5.cfg | sed -e '6s/batch=64/batch=1/' > yolov4-p5-896.cfg
#ln -sf yolov4-p5.weights yolov4-p5-896.weights
#
echo
echo "Done."
将模型转换为onnx以及tensorrt engine。
python3 yolo_to_onnx.py -m yolov4-tiny-416
python3 onnx_to_tensorrt.py -m yolov4-tiny-416
执行完成后,将会保存为yolov4-tiny-416.trt文件。
(6)使用tensorrt engine进行推理测试
cd && cd tensorrt_demos

python3 trt_yolo.py --usb 3 -m yolov4-tiny-416
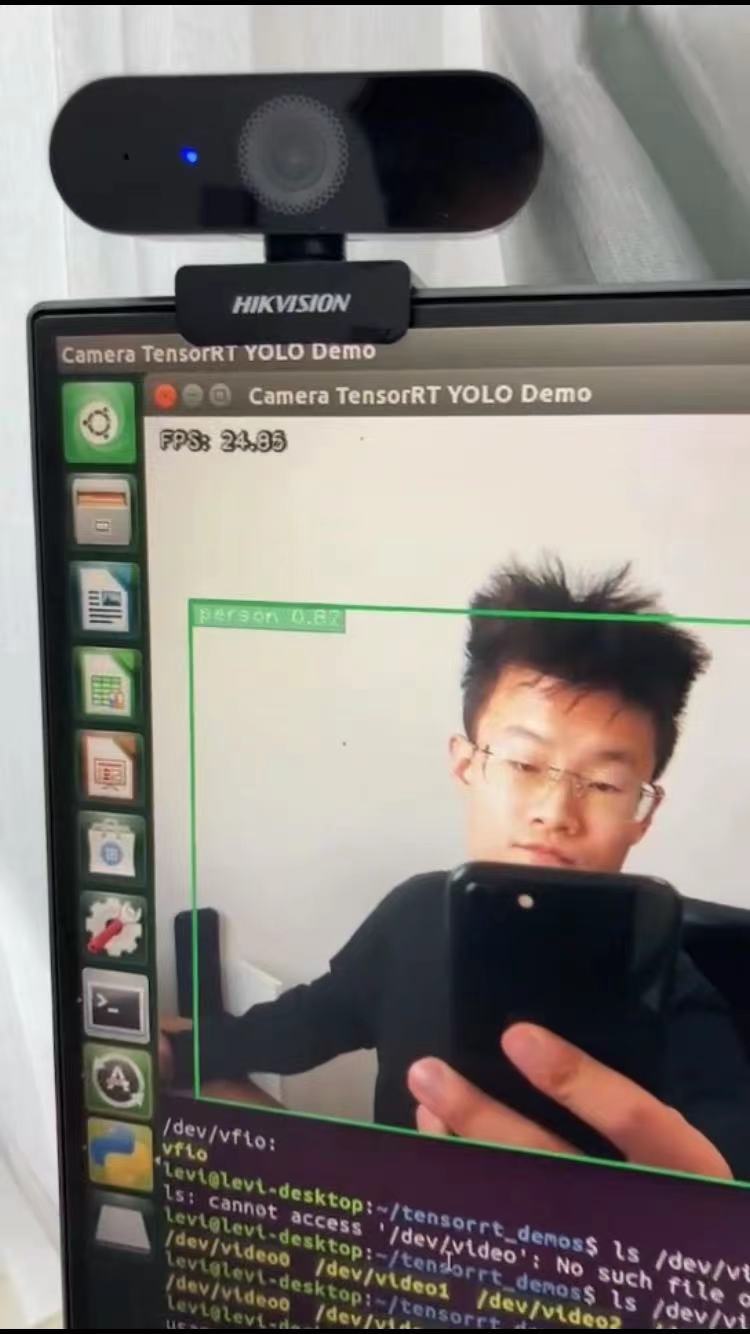
其中,--usb参数代表的是使用USB camera,3代表USB camera的ID号。此ID号通过ls /dev/video*查看,笔者的USB camera为/dev/video3,因此仅传入号码3即可。
测试结果如下图所示,推理的帧率稳定在25帧左右(5V 4A的电源)。
4.使用Tensorrt部署自己的YOLO模型
如果使用的是自己的数据集和标签,以及对模型进行了修改,部署tensorrt稍微有些不同。